Yamaha R3 / MT03 Exhaust Dyno Test and Superbike Build
How much power does the R3 / MT-03 make? This is the most extensive Yamaha R3 exhaust and Superbike build information you’ll find anywhere! Read on!
It’s been a couple years since I first released my article on the Yamaha R3’s power and some of the available exhaust systems. But a lot has changed in the past couple years so it was time for an update. Several existing full exhaust systems for the R3 have been updated for better performance and many new ones have been released. Working with different shops and paying for dyno time was just getting too expensive and difficult to get the data I needed, and just wasn’t a viable option for developing my own superbike parts, so I finally just bought my own Dynojet 250i and hauled it back to San Diego. How’s that for dedication? Now it’s on!

***This is important, please don’t skip over this:
Before I just post a bunch of graphs of dyno runs, I want to explain a few things. Dyno charts can be very misleading without some back story and more complete information. First of all, dyno charts are generally only printed for the results at 100% throttle. There are also different results for each throttle position, and these are all tuned separately, so the tune you are looking at on a dyno graph, is only a very small representation of how the bike is running, and really only useful for comparisons like this. A more thorough comparison between 2 systems would have to include dyno graphs from all throttle positions from 0-100% combined with some ride time on the street or track. Through all of my testing, I have tried to make the tests as scientifically fair as I could. Tried to stick to apples to apples comparisons and remove as many variables as possible. But, there are a lot of variables with dyno tuning motorcycles. Gaining a reasonably thorough understanding of these variables has been time consuming, but necessary. There can be big differences with tuners, fuel, even bikes of the same model, and dynos and O2 sensors can show significant variation from one to the next, and bikes and dynos can perform very differently at different operating temperatures to name a few. I’ve noticed a gradual slight increase in performance as my dyno heats up from friction and braking. Because engines perform better as they heat up to their designed operating temp, it’s normal to take a series of pulls on a dyno and watch the numbers increase until they stabilize before using the pull as a reference. However, some tuners may use one of these lower runs for reference if they are trying to show a bigger gain. With the R3, this is typically around a 2HP change as the bike heats up. And this change occurs once the bike is already warm. I’m talking about a difference between about 140 degree coolant temp where the 3 bars light up on the dash to about 170-180 degrees where the R3’s performance peaks but before 4 bars light up. I generally don’t even record this warmup process, but so you can see, here’s a baseline series of pulls from a 2016 R3 with a full system I was going to tune, you can see the performance increase from low 36s as the engine heats up until it stabilizes around 38:

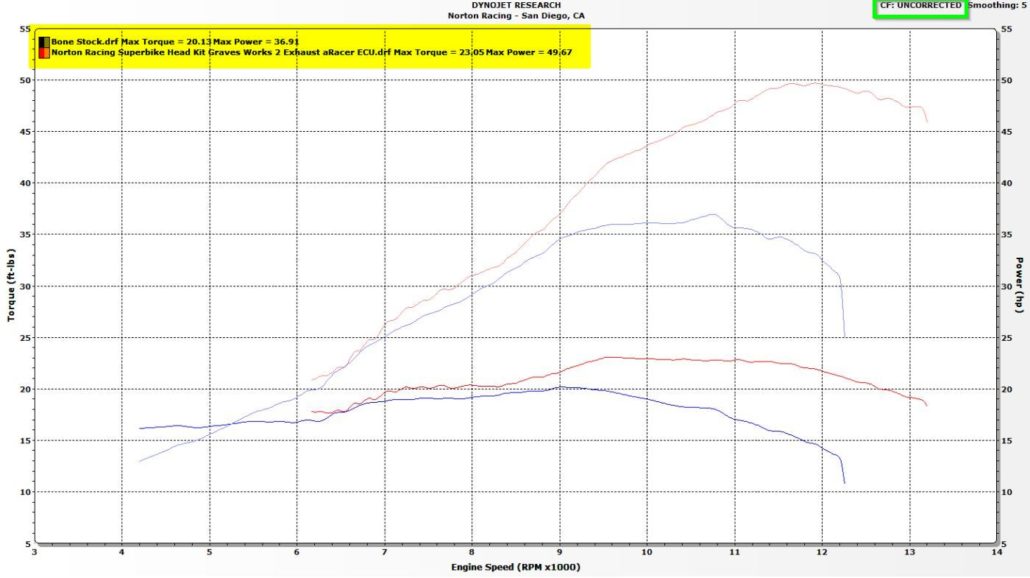
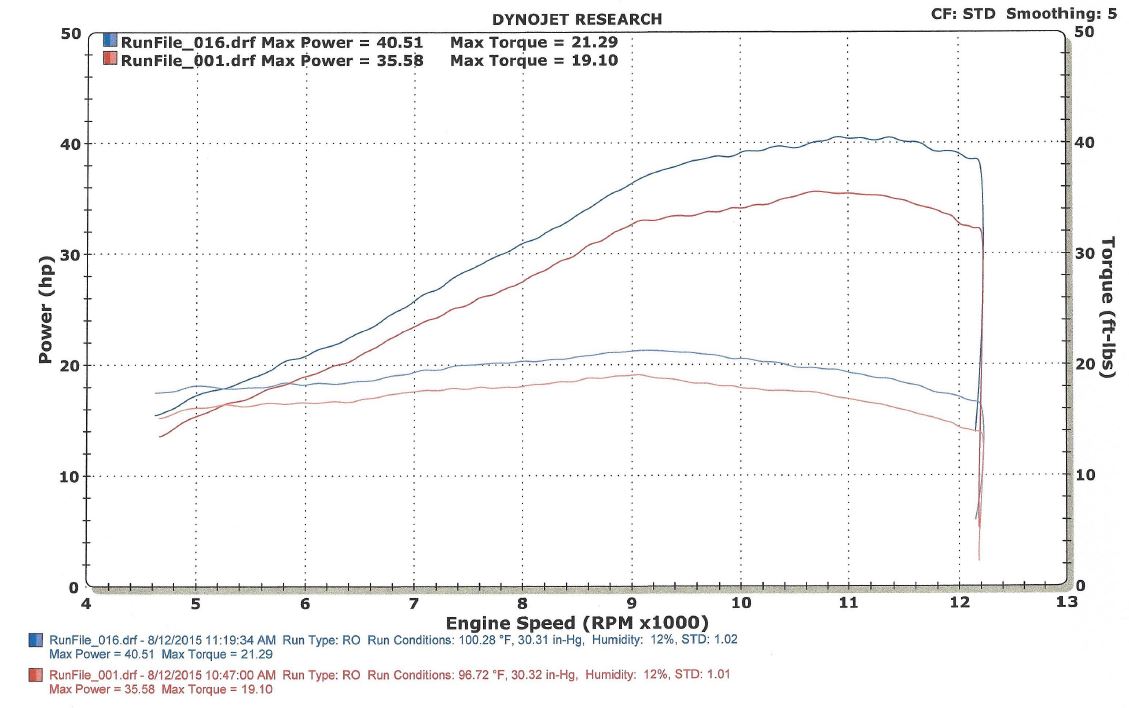
There is also something very important called Correction Factor, identified with a CF: at the top right of Dynojet charts. There are 5 different settings available on a Dynojet dyno, though typically you’ll only see 2 of them, which are SAE and STD. SAE is the current industry standard, but a lot of tuners will still print dyno charts in STD correction because the numbers are always higher, which is a bit misleading to customers. There are lots of good articles detailing the differences online, but here’s the quick and dirty explanation. Engines always make more power with cooler, denser, dryer air. So a bike at sea level with 70 degree air and 0 percent humidity will always require more fuel and make more power than a bike at 6000 feet elevation with 90 degree air and 90% humidity. Correction factor is a calculation applied to power numbers to “level the playing field” so engines can be compared from all over the world as if they were on the same dyno, in the same place, under the same conditions. SAE Correction assumes 77 degrees F, 29.23 inHg and dry, 0-percent humidity air, while STD Correction assumes 60 degrees F, 29.92 inHg and 0-percent humidity. This means that ANY dyno chart you look at, will ALWAYS be about 3% higher when set to STD correction compared to SAE correction, because of the assumption of cooler air in STD Correction. It’s rare that anyone will ever show an Uncorrected dyno chart because in most places in the world, conditions are less than optimal and numbers will be much lower and vary a lot from day to day. But the reality is that the Uncorrected number is what the engine is ACTUALLY making at that time, under those current conditions.
Here’s an example, below is the same 2 dyno runs from my bike with the only change being the Correction Factor calculation changed. You don’t have to change the correction factor and do another pull, it’s just a calculation applied to the data, so these are applied to the exact same 2 runs in each picture. See the increase in power in both runs when switched to STD correction? Free horsepower!


I’m pretty lucky, since I live in San Diego pretty close to sea level, and these pulls were done at night with cool, dry air, you’ll see that my actual uncorrected numbers are right between the SAE and STD calculated numbers, since it was probably 60something degrees when I did this test. Usually you’ll see the uncorrected numbers much lower than the calculated SAE or STD numbers:
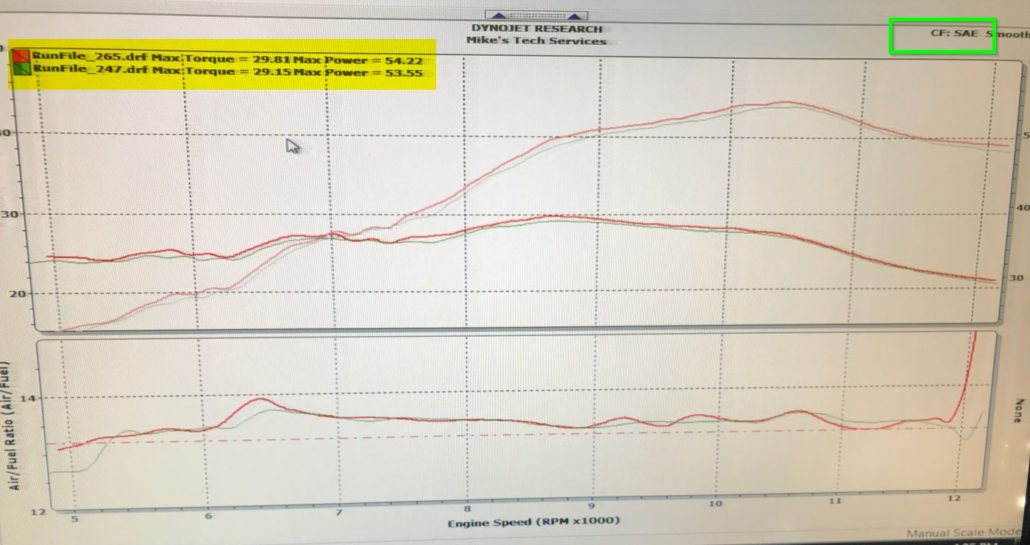
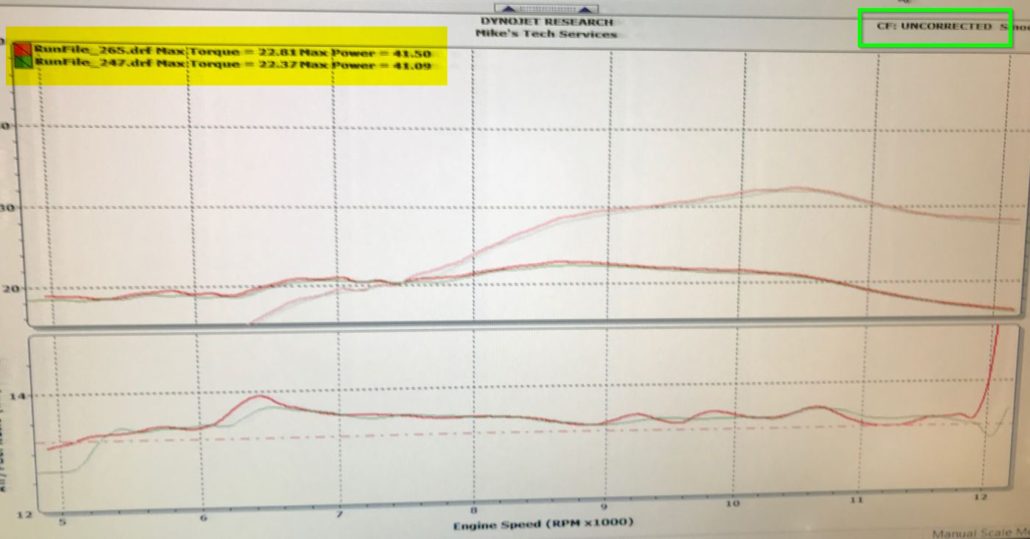
To illustrate how dramatic this can actually be in different areas of the world with different elevation and temperature, here’s two charts from a close friend’s dyno while doing some of our Ninja 400 SBK testing showing the same two dyno pulls with SAE correction and then uncorrected at 7000 ft elevation where the air is much less dense than the corrected assumption of sea level, power is actually down 23% from 54.22 to 41.50, that’s a pretty dramatic difference:
Got it? Good.
So, now that you’re a little more informed, I’ll proceed. I’ll use SAE correction in all of my charts for standardization, but any time you look at a dyno chart from here forward, be sure to check the Correction Factor used, usually in the top right, to see if someone’s trying to pull a fast one on you.
Okay, so how much power does the Yamaha R3 make and what is the best exhaust???
First let’s examine some various dynos of stock bikes and some before and after type results to get a baseline for the Yamaha R3. I have data from a few different stock R3s. My original 2015 R3, which was tested on the Lee’s Cycle dyno:
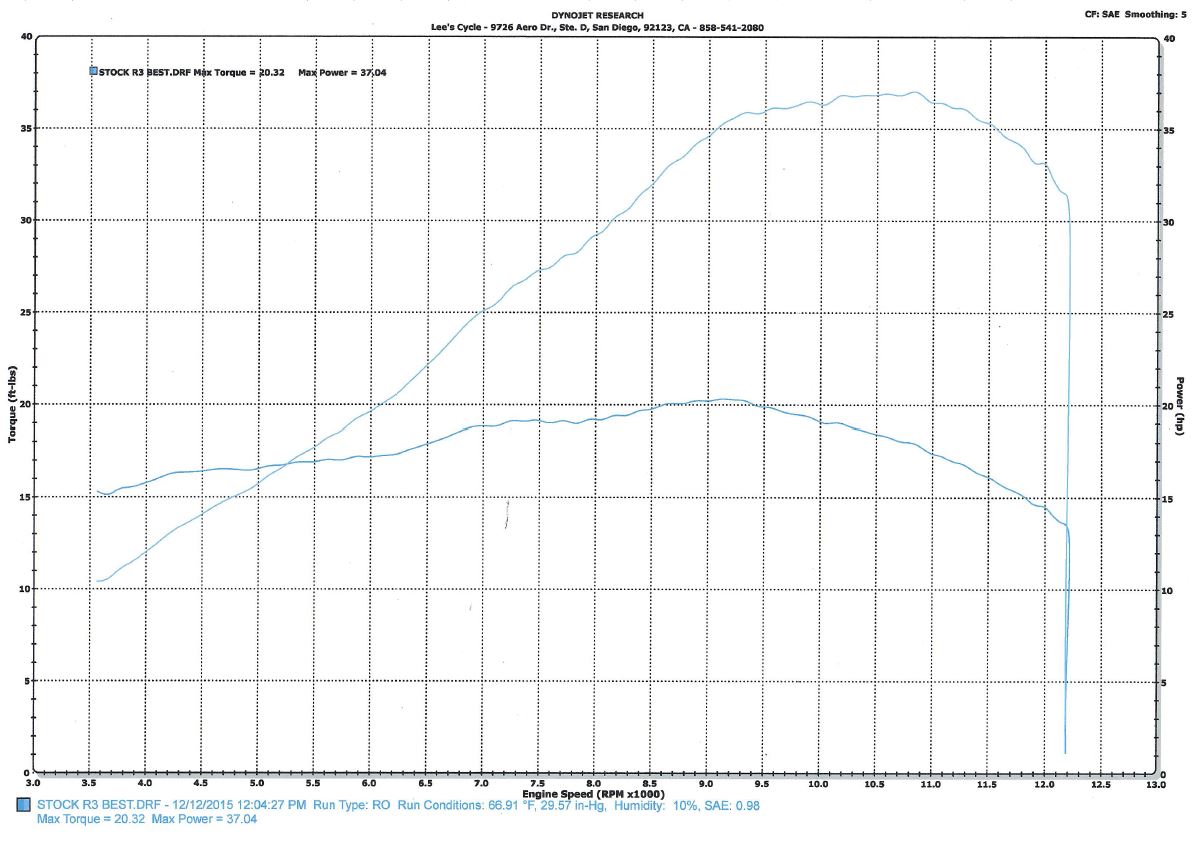
And my brand new 2019 R3, which has the same engine, other than the cams being slightly updated for 2017:

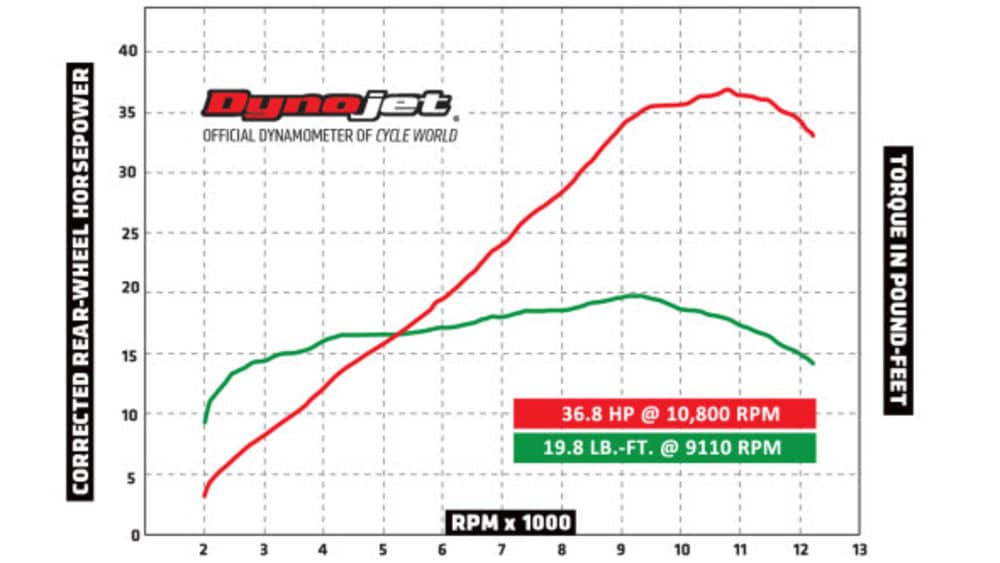
Here’s another bone stock run of a 2015 R3, done by Cycle World. They measured the bike at a similar 36.8 HP and 19.8 ft lbs of torque.
And here’s one more test done by Motor Cyclist Online comparing the 2015 R3 to the Ninja 300, KTM RC390, and Honda CBR300R. This test put the power at a similar 37.3 HP and torque at 20.0 ft lbs.
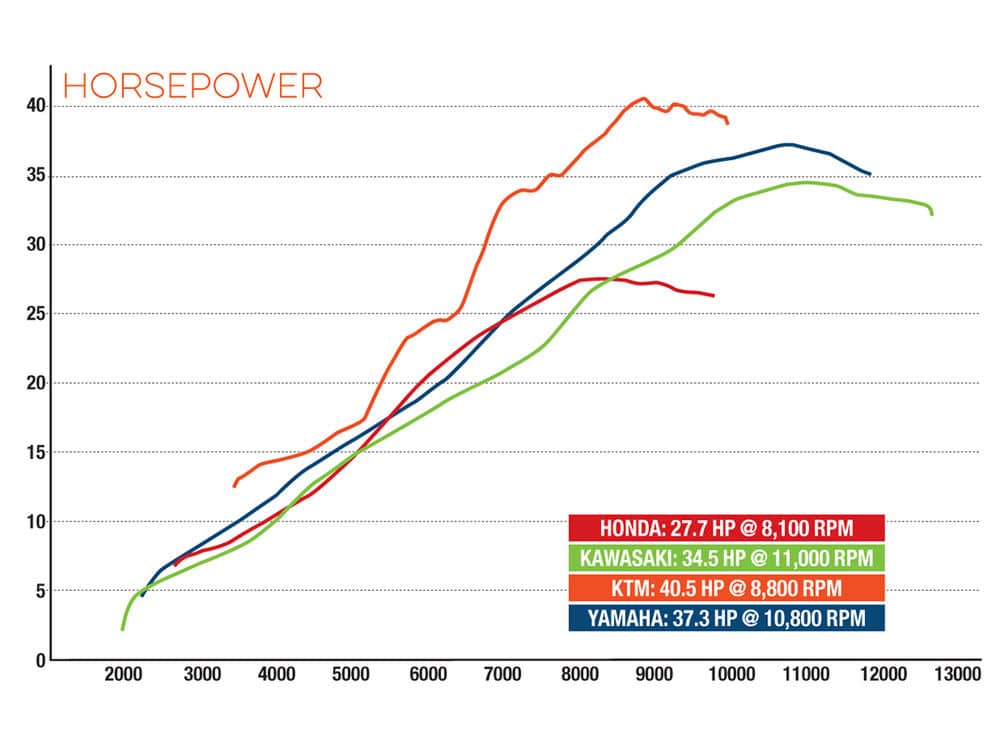
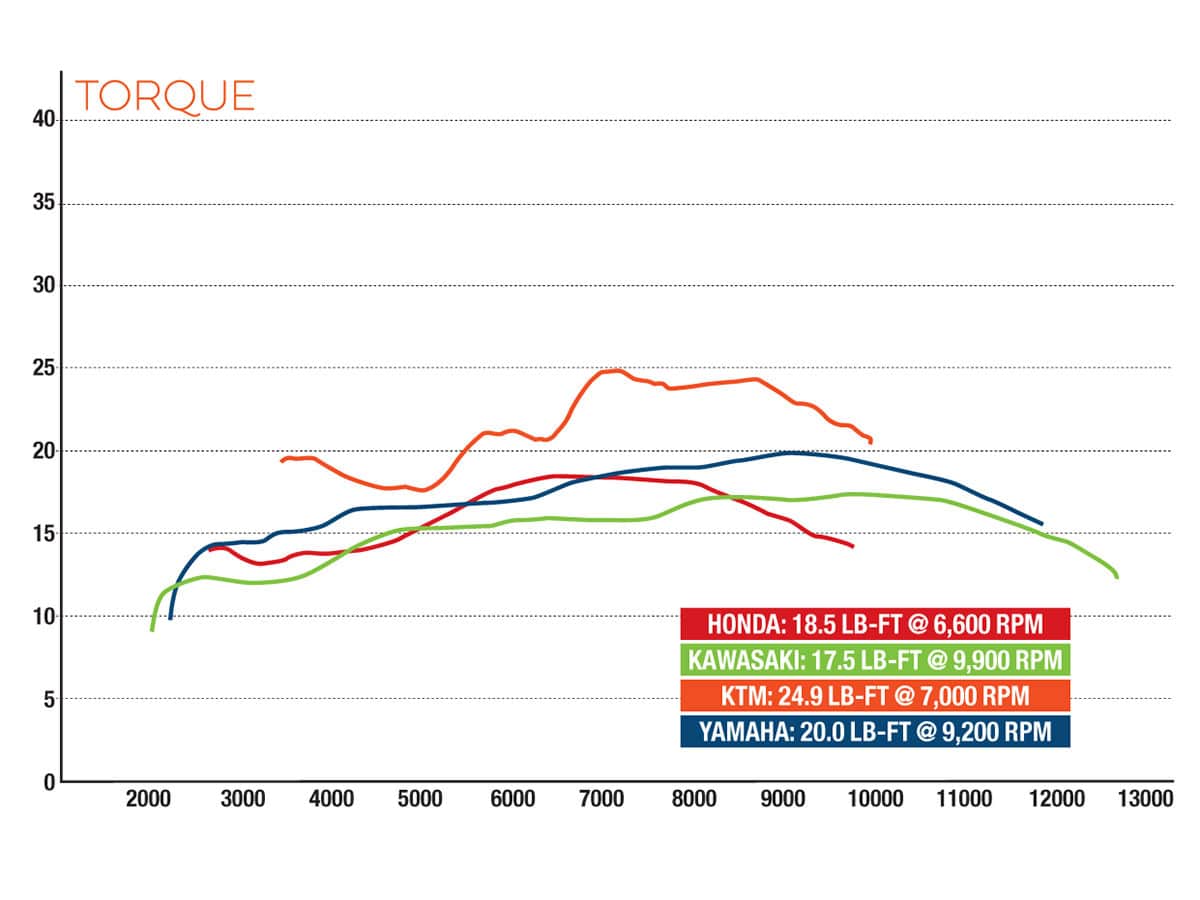
These tests are all done in California, which is worth noting because elevation and AFR readings will all be pretty similar. So, from looking at all these results as a whole, my sense is that there is only around a 1-2 HP variation at most between Yamaha R3 motors from the factory depending on the bike, and in California, they seem to make 36.3-37.3 HP. This variation could be from a lot of things from machining and assembly tolerances of various parts in the motor to exact cam timing during assembly. I have seen other baseline dyno charts showing the R3 in the 34-35 HP range and my take on these is that most of them are at higher elevations or in hotter, more humid climates where, even though a correction factor is applied, the bike is still running much richer than the bikes here in CA close to sea level, and thus making less power because the AFR is a bit off. Also, a lot of before/after type dyno charts with full exhausts put the starting numbers down in the 34-35 HP range because the R3 actually loses power when you install a full exhaust until you adjust the fueling to compensate, so the power drops from the stock 36-37 down to 34-35 until you adjust fuel and bring it back up.
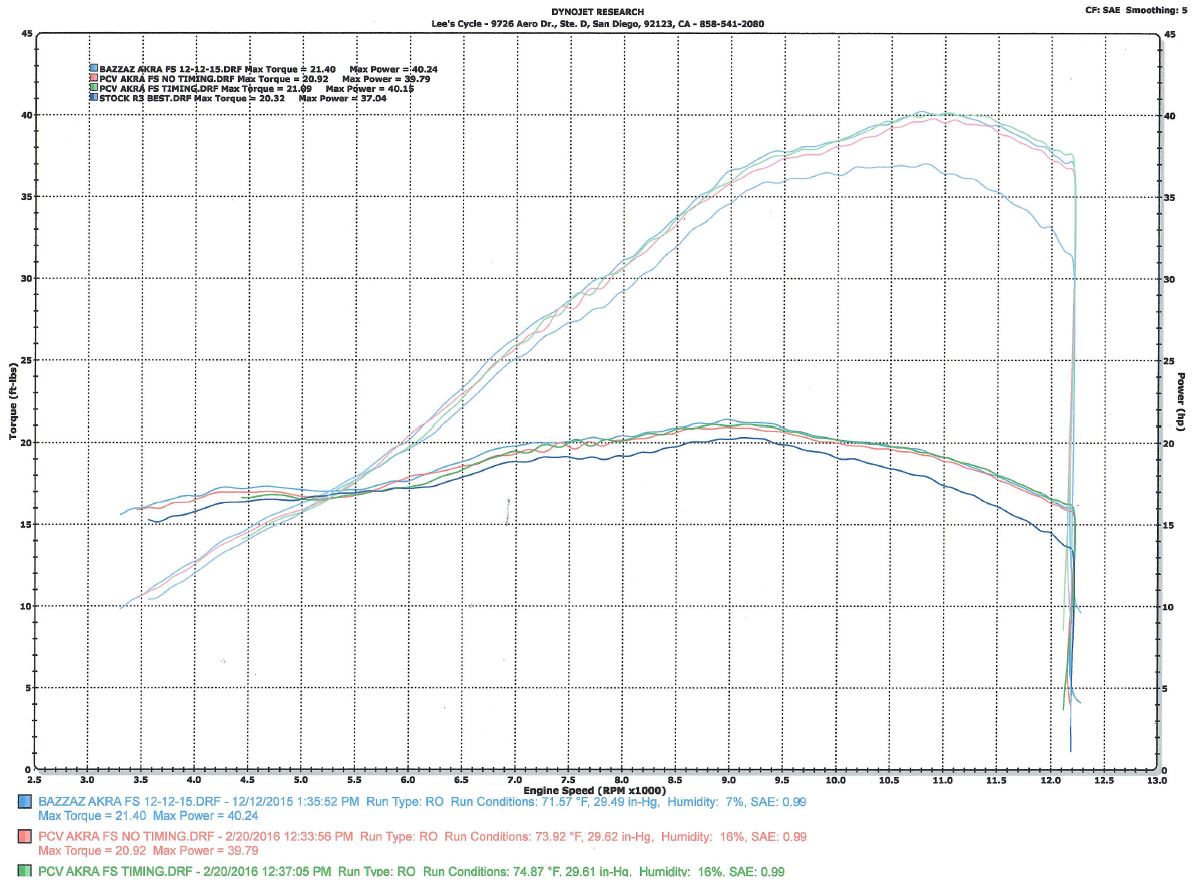
Take a look at this chart below. These are two runs on my bike with the Akrapovic full system tuned with the Bazzaz Z-Fi. These runs are done with the same fuel map on the same dyno, but one of them is done on December 12, 2015, the other on February 20, 2016. Temperature is pretty close, but humidity is higher in February. Both tests are done with 91 pump gas but it’s different gas. With the leaner, tuned AFR in December, the setup did 40.24 HP. In February, with no changes to tuning, the AFR was richer by about .8 and power dropped to 38.71. That’s 4% lower output only 2 months later at almost the same temperature with the same setup and fuel map and I probably only put 100 miles on the bike between these 2 tests. Part of this change is likely from the richer AFR, but part of it is probably from other factors that can’t be seen in this report, such as engine or dyno temperature, changes to timing in the ECU, or something else. I didn’t personally do these pulls so I can’t verify as many factors.
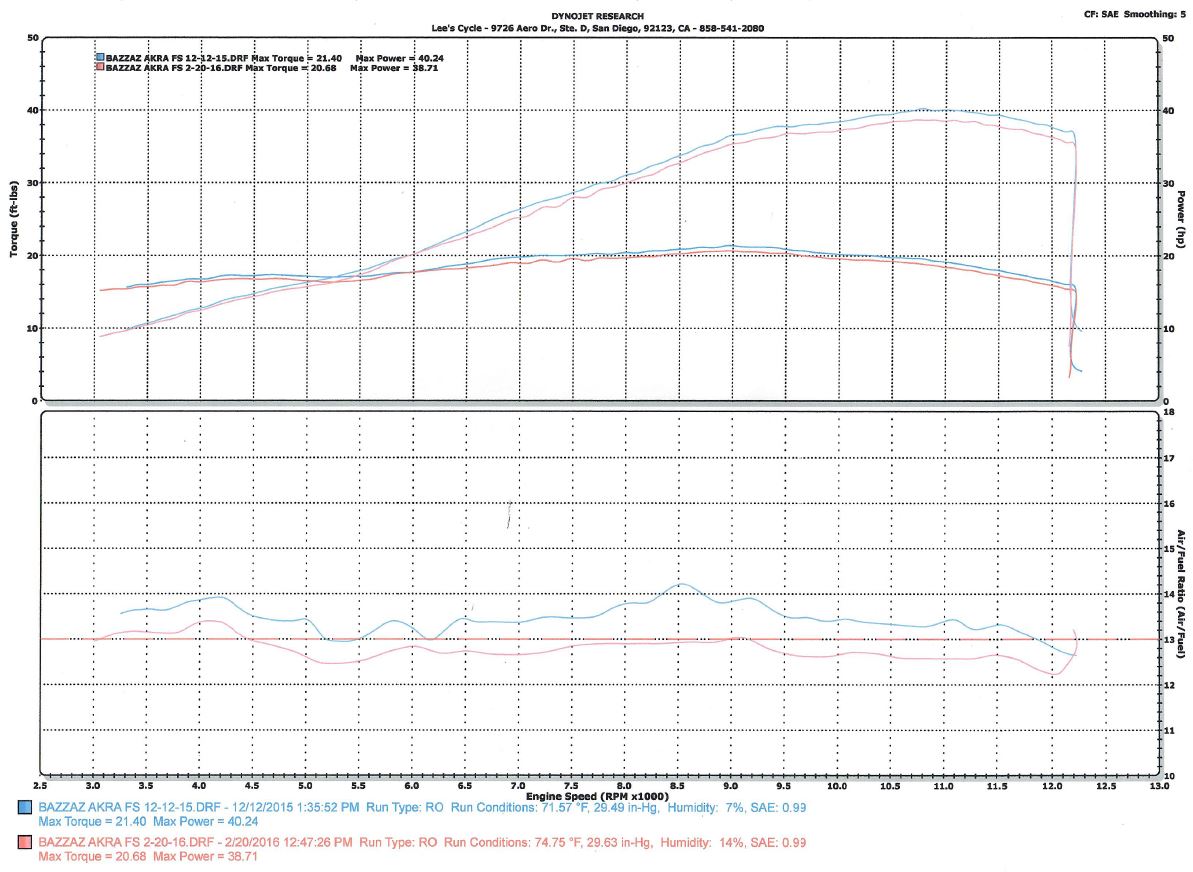
This experience changed my perception about tuning motors and my definition of “a good tune”. Instead of believing that a good tune is the one with the highest horsepower number on a chart, I now understand that it is more complicated than that. A good tune must take into consideration more info, like where the bike will be used, elevation, climate, fuel, and more importantly, how the bike performs when it’s slightly lean or slightly rich. A good tune is a balance of all of these factors to give as close to optimum performance as often as possible. The bike’s power and power delivery will fluctuate as AFR rises and falls and it’s important to understand what happens when the bike runs slightly lean or slightly rich, since you will undoubtedly be running a little lean or a little rich at least some of the time. When racing, it’s ideal to adjust fueling at every track for the given conditions if you really want to maximize performance, but doing this accurately is not easy, and not cheap, and typically only done by teams with a pretty solid budget.
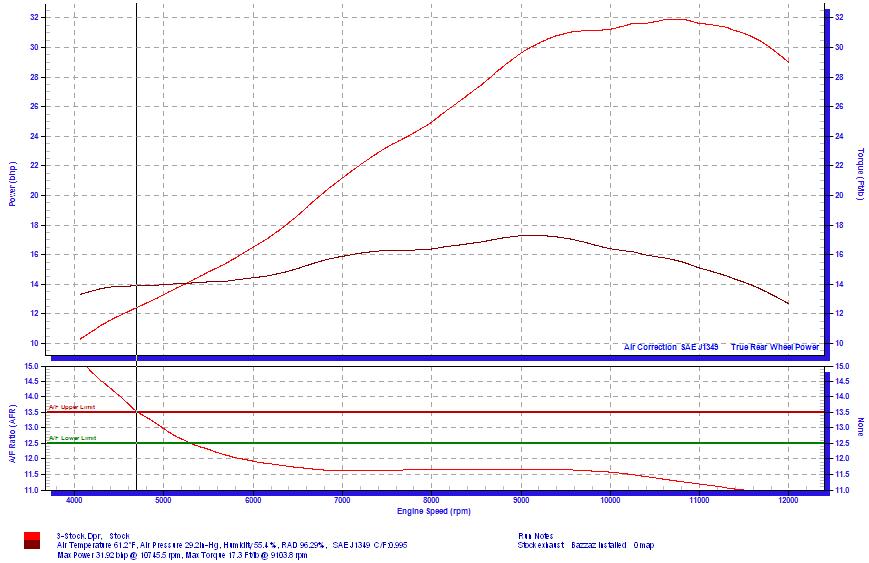
There are several different dyno manufacturers as well, with Dynojet being the most common, at least in the USA. Different dynos can read power very differently as well. Here’s my same 2015 bike, bone stock, done at the Bazzaz facility on the Bazzaz Principia dyno. It’s a little blurry and difficult to read, but the best run recorded 31.92 HP and 17.3 ft lbs of torque, considerably less than the 36-37 on Dynojet dynos. So there is definitely a difference between how the Bazzaz and Dynojet dynos read, even on the same bike. And of course, both companies will tell you their’s is correct. So this is why for consistency sake, all of the rest of my testing is from Dynojet dynos and the dyno I bought is a Dynojet 250i.
Full system exhaust vs. slip-on exhaust Because this website is all about building the Yamaha R3 for track riding and racing, I’m only going to touch on slip-on exhausts for a moment. A “slipon exhaust” only replaces the muffler tip, and not the header pipes or midpipe. Except for a few models like the M4 Street Slayer and similar exhausts that require you to cut out the silencer and catalytic converter and “slip on” to the cut collector pipe. These behave much closer to full systems than slipons. When talking about the R3, the silencer (the big metal blob in the exhaust under the bike) and catalytic converter are attached to the midpipe, not the muffler tip. This means that the most restrictive part of the exhaust, that is, the catalytic converter and silencer, remain in the system when you replace the muffler tip with an aftermarket slipon exhaust muffler. Because of this, there is almost no change in the performance of the bike from stock with ANY slip-on exhaust on the market. There is also very little change in the sound of the exhaust with the various slip-on exhaust system. You can even remove the muffler completely and it will barely affect the sound or performance. All you are really changing with a slipon exhaust is the looks.
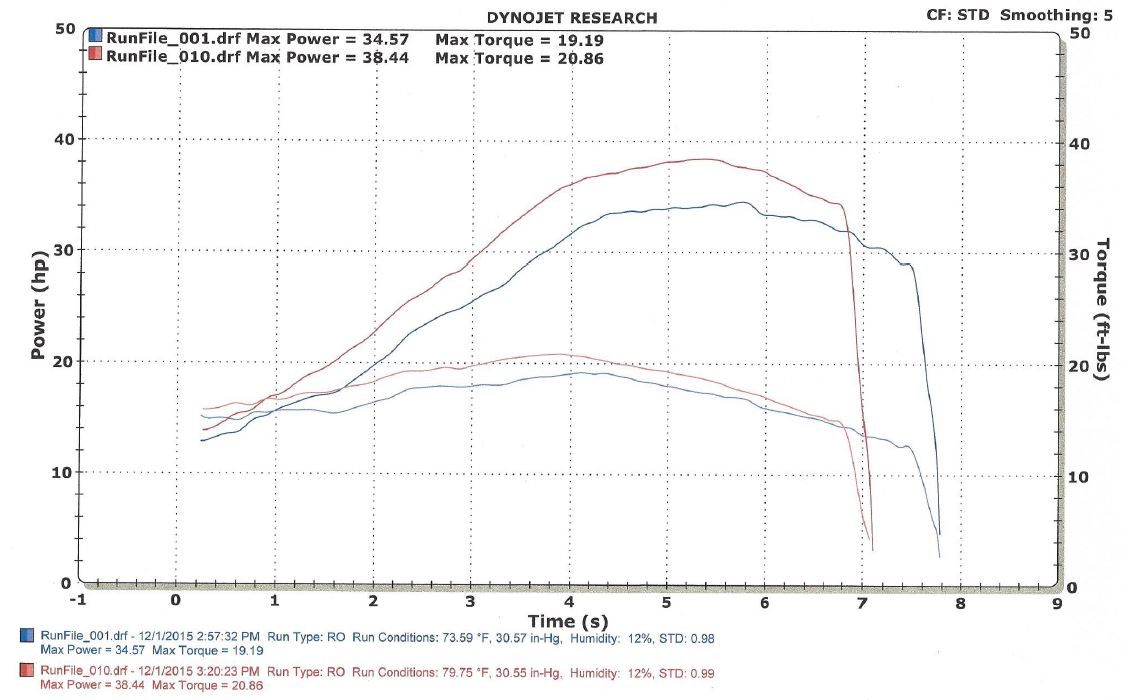
Do I really need a fuel controller with a full system exhaust? This question comes up a lot, so I hope this section will help answer the question. These are dyno charts showing the bike with a full exhaust installed, before and after a custom tune was done with a Bazzaz or PCV. This is important because you will notice the starting HP numbers are very low, in the 33-35 HP range, a couple HP less than the bone stock bikes above. I wanted to demonstrate that when you install a full system exhaust on a motorcycle, you drastically change the air flow and back pressure there is in the exhaust system, and this has much larger effects on the air/fuel ratio than the stock O2 sensor and ECU can adjust for. You end up with a bike that runs WAY out of the ideal air/fuel ratio range, and this dramatically hurts performance. Whether or not it is detrimental to the motor is another discussion, but it certainly is not good for it. From a performance standpoint, you are better off running the bike bone stock, or with a slip-on exhaust, than installing a full system exhaust without a fuel controller. This chart shows an R3 with an Akrapovic full system exhaust (with the quiet insert installed) before and after custom tune with Power Commander PCV (this graph looks a little funny because it has time across the bottom instead of engine RPM, but that won’t affect the numbers). Also note, that this chart is printed with STD correction, so as discussed above, these numbers will be about 3% higher than SAE numbers:
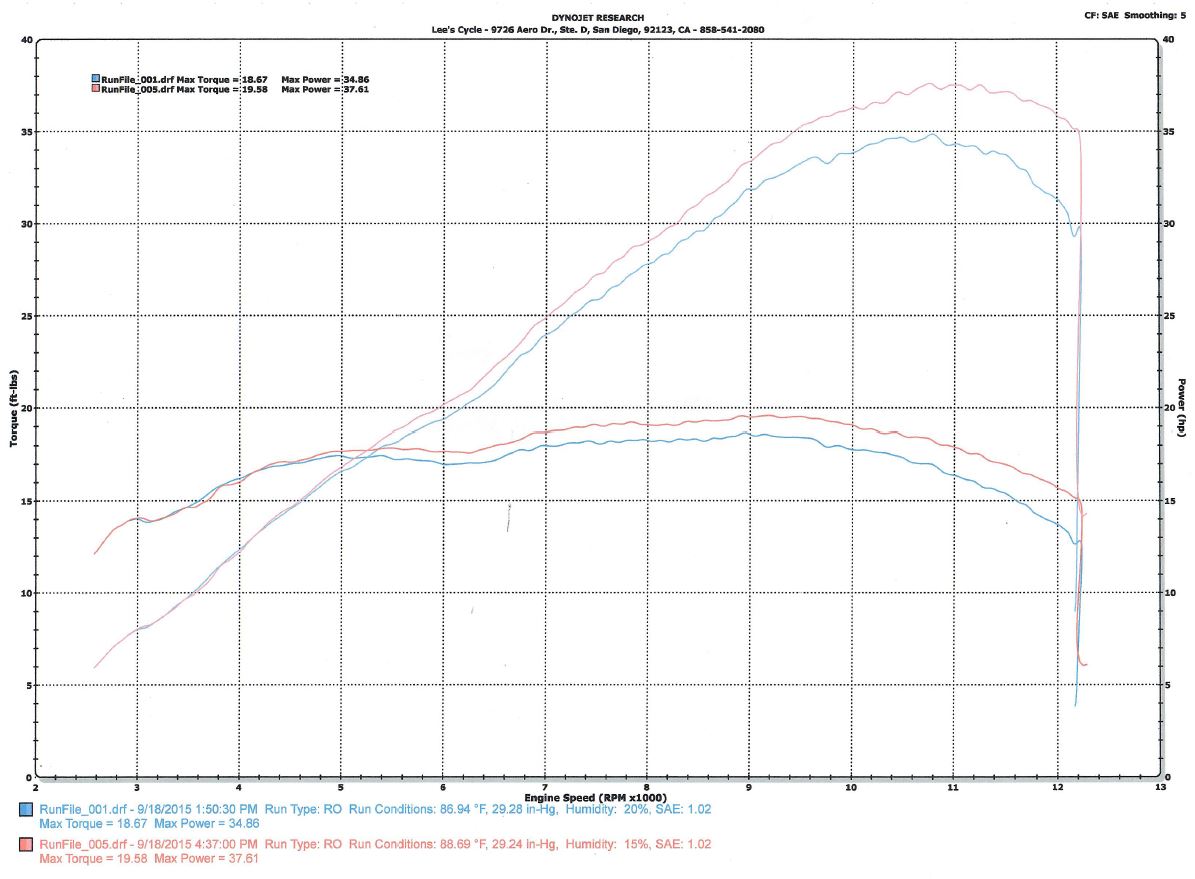
This chart shows an R3 with a Yoshimura full system exhaust (with the quiet insert removed) before and after custom tune with Power Commander PCV, this chart is SAE correction:
This chart below shows a different R3 than above with a Yoshimura full system exhaust (with the quiet insert installed) before and after custom tune with Power Commander PCV. This chart again uses STD correction and will be about 3% higher because of that. Even reducing these numbers 3% to account for the STD correction (39.3 HP), this does demonstrate something I, and other tuners have seen over and over again, which is the fact that the R3 performs better with the noise restriction silencers installed in the exhaust, and always seems to be down on power with exhausts that are completely unrestricted in the end.
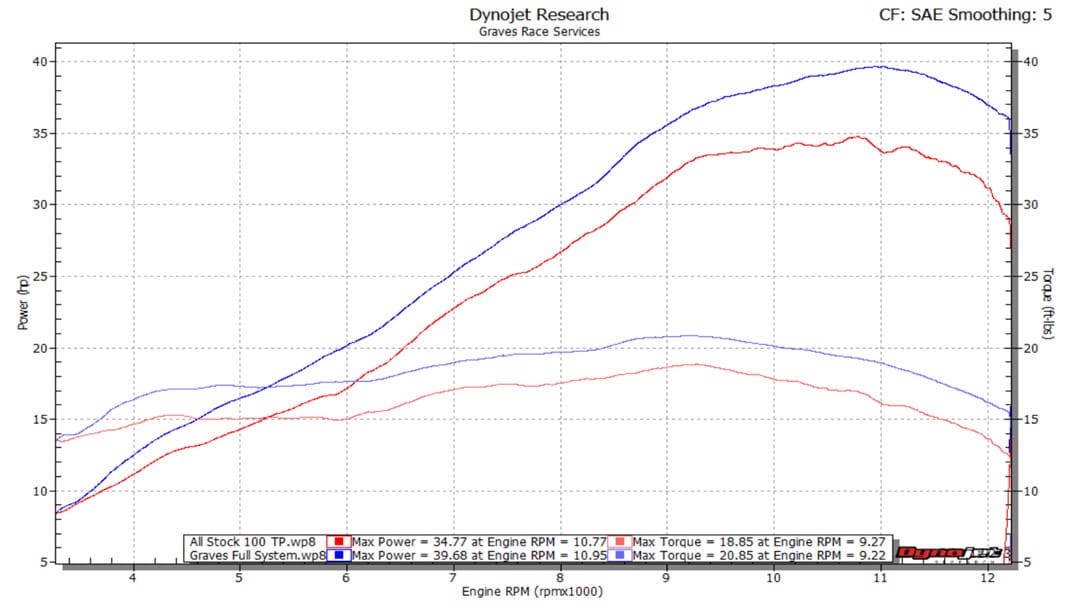
This chart shows the before and after tune with a Graves full system exhaust with the quiet insert installed. I’m not sure if this is tuned with PCV or Bazzaz. Again, notice the low starting number, 34.77, well below the stock bike’s 36-37, and then a gain up to 39.68 using SAE Correction.
Stock Bike vs. Bike with Full Exhaust and Custom Tune
Akrapovic was the first company to release a full system exhaust for the R3 in early spring 2015, but only a couple systems were imported to the USA. Fortunately, I got one for testing, but they didn’t become available for sale until June. Shortly after the Akrapovic systems started shipping, Yoshimura released a full system, and the two companies battled over early exhaust sales. M4 released their system at the end of Summer 2015 and Graves was not far behind M4. Early tests of the stainless steel Akrapovic full system were a bit underwhelming, and I came to soon learn this was because the exhaust was originally developed for the R25 in Asia, which is why it was first to market. A couple years later, Akrapovic redesigned the system for the R3 and the new system also features a carbon fiber muffler can, so it’s easy to distinguish which system you are getting. I picked up a carbon Akrapovic system to retest. With the rules change in MotoAmerica from the KTM RC cup to the new Junior Cup, which allows bikes from all the different manufacturers compete, Graves Motorsports invested a ton of development time and effort to optimize their exhaust for the R3’s little engine and re-released their exhaust in the fall of 2018 as the Graves Works 2 model, which I have thoroughly tested below. Another top performer that I didn’t get to personally test because it was released after original test was Arrow’s Evo system, and with the release of an updated version, the Arrow Evo 2, I had to get ahold of one for the second test, and I chose to test the full titanium version so we could see how much weight was really saved by spending a few hundred extra on titanium headers. My early tests in 2016 put the M4 full system on top in performance and value, so it was a no-brainer for most people and we ran it on all of our YamahaR3Racing.com team bikes. When the full titanium M4 system was released, I had a chance to test it against the stainless version and performance was essentially identical, so I used the full titanium system in my second test since it was the lightest exhaust on the market.
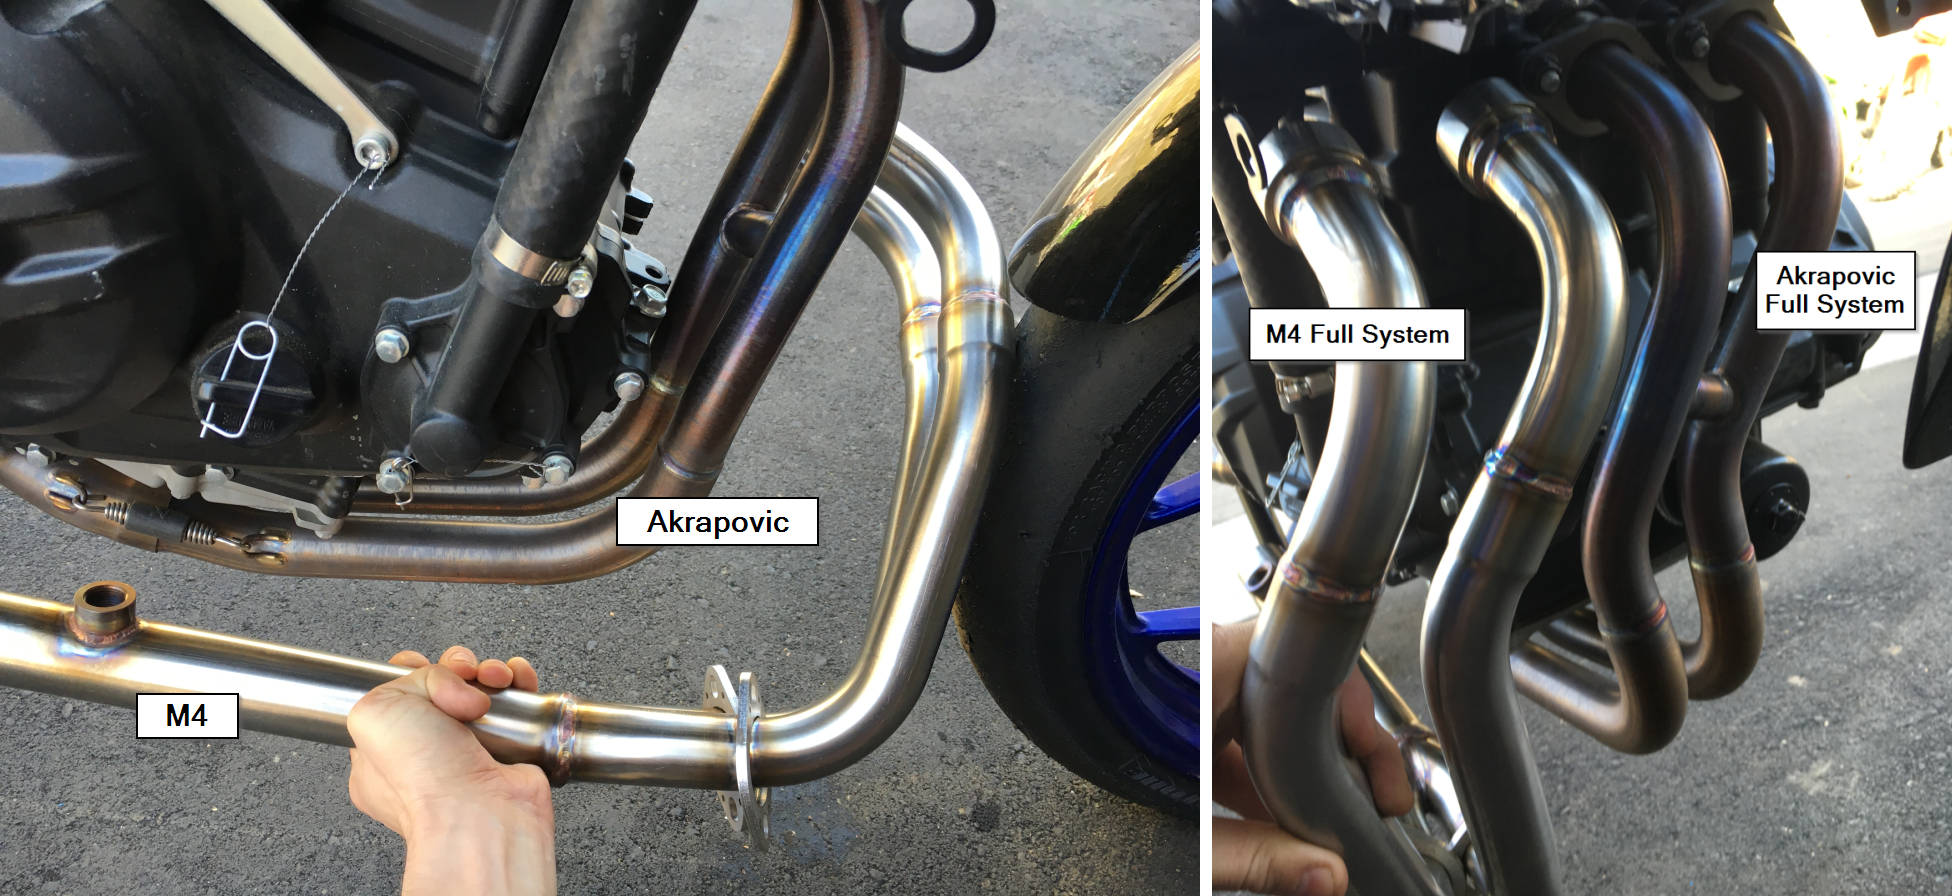
The original Akrapovic SS system had pretty dramatically smaller header pipes compared to some of the other systems, and was closer in size to the stock pipes. I’m not an exhaust engineer, but again, I assume this was due to it being designed for a smaller displacement bike, and probably contributed to the lower performance:
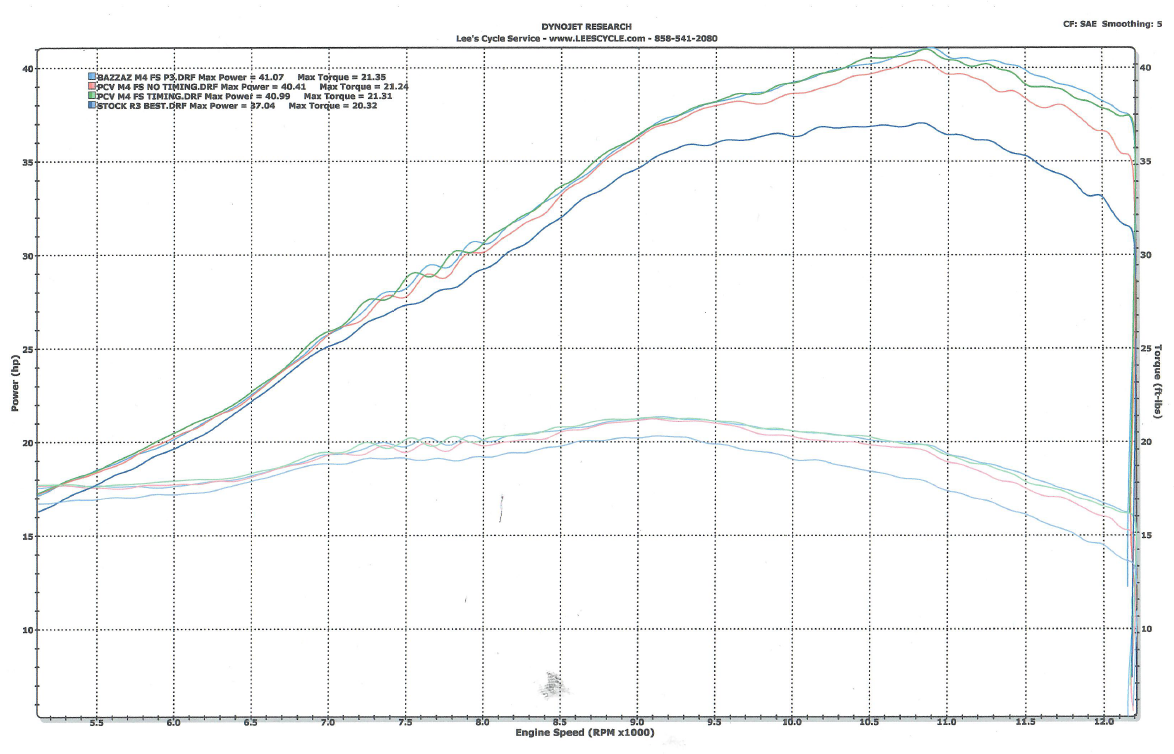
Okay, now we start getting to the fun part. Keep in mind, all of these tests are done with 91 pump gas. Next are a couple more charts, all done on my 2015 R3, on the same dyno at Lee’s Cycle, and with air/fuel ratios in the ideal 13.2-13.5 range. I wanted to separate these to clarify that the before number on these charts is the bone stock bike, not the bike with the full exhaust and no tune. This is a more fair representation of the gain you will receive by installing a full system exhaust and a fuel controller compared to the bone stock bike. This is my bike stock compared to my bike with the M4 full system exhaust (with the quiet insert installed) tuned with a PCV and with a Bazzaz Z-Fi. All three of these tuned runs are also done on the same day. There are two PCV runs, one of them with the ignition timing advanced as part of the tune, and the other with the ignition timing disabled but the same fuel map. You can see that the results of the PCV with timing and the Bazzaz Z-Fi (which doesn’t have timing adjustment) are virtually identical across the entire graph. Peak power numbers of 41.07 and 40.99 and torque values of 21.34 and 21.31 are also nearly identical. The results of the PCV without timing are slightly lower, but there was also a slight change in the air/fuel ratio when I disabled the ignition timing advancement that I did not correct for. This leads me to believe that changing the ignition timing on the R3 with the M4 full system results in a change in the air/fuel ratio, but not necessarily an increase in performance. When the air/fuel ratio is properly adjusted using the Bazzaz Z-Fi, it performed exactly the same as the PCV with ignition timing slightly advanced.
This chart shows my bike stock compared to my bike with the Akrapovic Stainless Steel full exhaust system (with the quiet insert installed) tuned with a PCV and with a Bazzaz Z-Fi. There are two PCV runs, one of them with the ignition timing advanced as part of the tune, and the other with the ignition timing disabled but the same fuel map. You’ll see that like the results above, the results of PCV with ignition timing and the results with the Bazzaz Z-Fi are nearly identical. The results with the PCV without timing are slightly lower, but again, there was also a slight change in the air/fuel ratio when I disabled the ignition timing advancement that I did not correct for. This leads me to believe that changing the ignition timing on the R3 with the Akrapovic full exhaust system results in a change in the air/fuel ratio, but not an increase in performance. When the air/fuel ratio is properly adjusted using the Bazzaz Z-Fi, it performed exactly the same as the PCV with timing.
So here’s the M4 head to head with the Akrapovic stainless system:
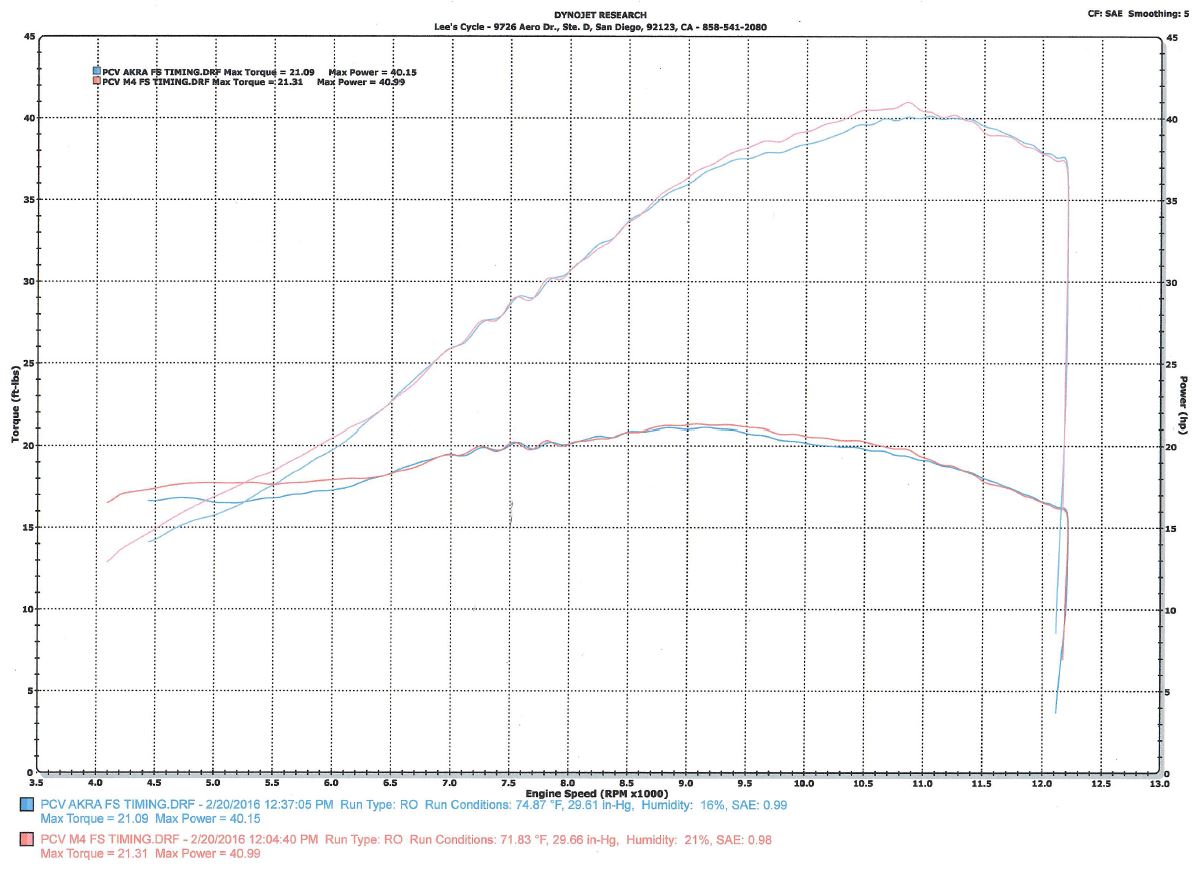
When MotoAmerica made the rules change to allow all manufacturers in the Junior Cup following World Supersport 300 rules, we put together a Yamaha R3 build package for the series. We had been using the M4 exhausts for all builds, but Spark had recently released some exhausts for the R3 and the distributor was very adamant about the Spark performing better than anything else so we bought one to give it a shot. Here’s the Spark Konix system compared to the M4 Titanium Works system, you can see that the performance is about as close to identical as you’ll get between two dyno pulls. The Spark may have the slightest advantage below 9,000 RPM, but since we never run the bike below 9,000 RPM on the race track, we decided to stick with the M4 for our builds since track performance was equal and the M4 weighed quite a bit less. Service and parts availability was excellent with M4 also being based in Texas.

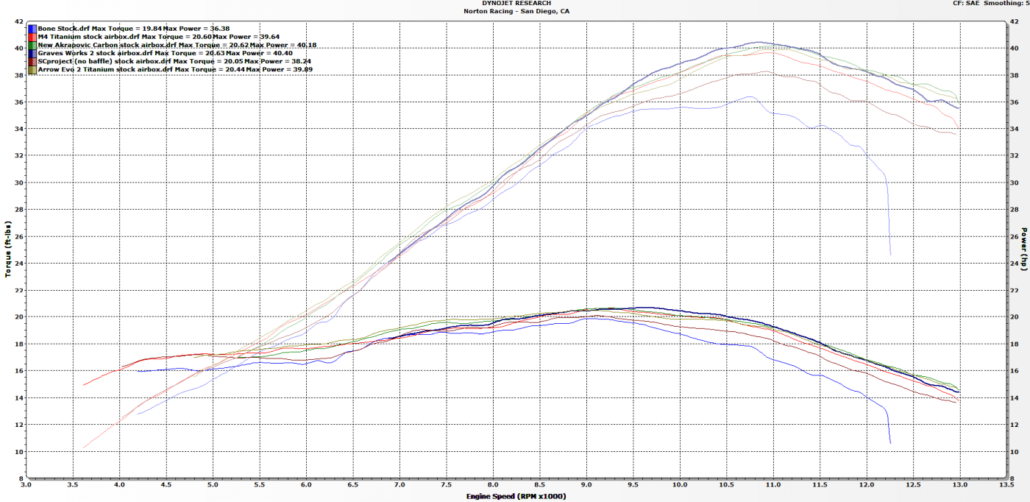
And here’s my updated exhaust testing done on my Dynojet 250i this past winter 2018/2019. All of the exhaust tests were done on my 2017 bike with a bone stock engine and airbox with an MWR air filter and using 91 pump gas. The stock run displayed is my new 2019 bike because I didn’t have a stock run from this 2017 on my dyno, but that isn’t really important. All the exhausts were tested on the 2017 with my Race Spec ECU flash as a base tune (you can see the higher rev limit) and each system was fine tuned with a Bazzaz Z-Fi. You can use the M4 titanium run as a reference to the previous tests since this motor seems to be a little less powerful than my old 2015. The new Graves Works 2, Akrapovic Carbon, and Arrow Evo 2 clearly make better top end power than the M4 and Akrapovic SS above 10,500 and the Graves Works 2 also makes better power and torque than the rest of the field between 9,500-11,000 rpm. I also wanted to test the latest offering from SC Project, but unfortunately they sent me the CRT version, which is a pretty short, unrestricted (and very LOUD) exhaust. It does illustrate what I was saying earlier about exhausts without any restriction for the R3. This CRT version SC Project kinda falls on it’s face compared to the rest above 8000 RPM, even with a custom tune. This is the same thing we saw from the Yoshimura and Akrapovic stainless systems when the baffles were removed.
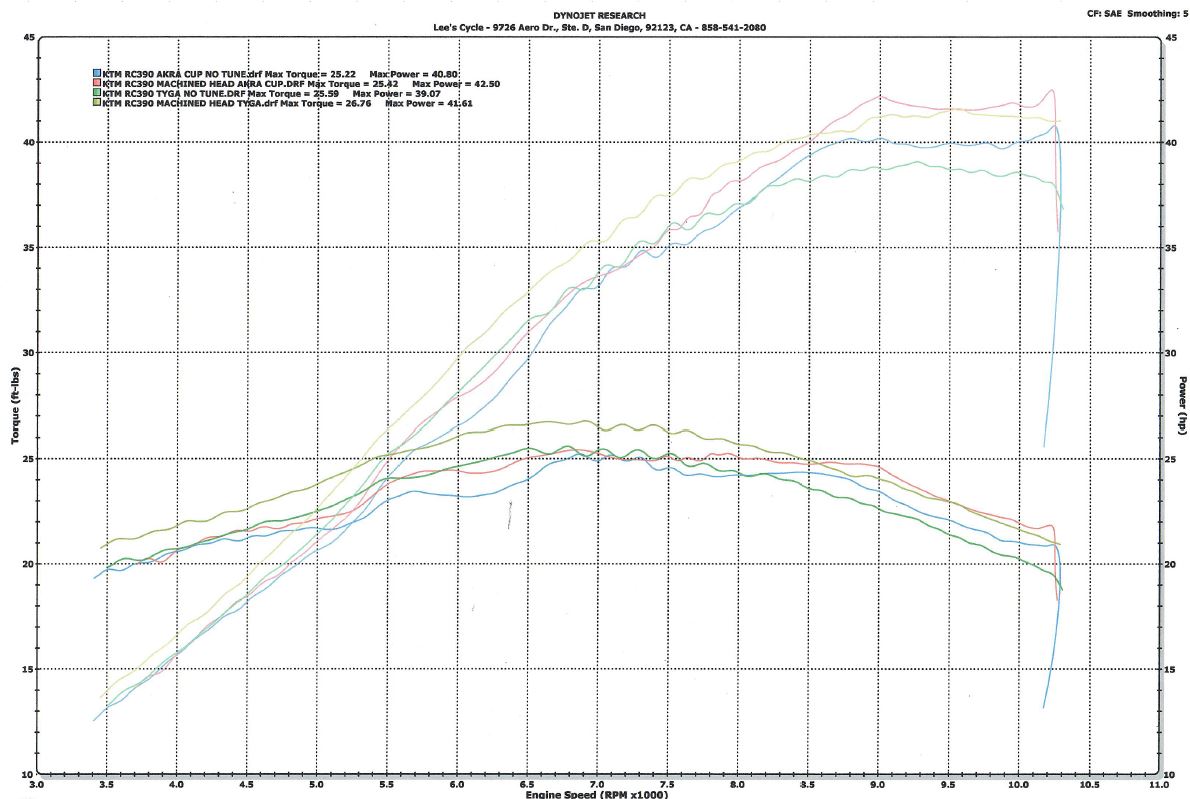
Yamaha R3 vs. KTM RC390
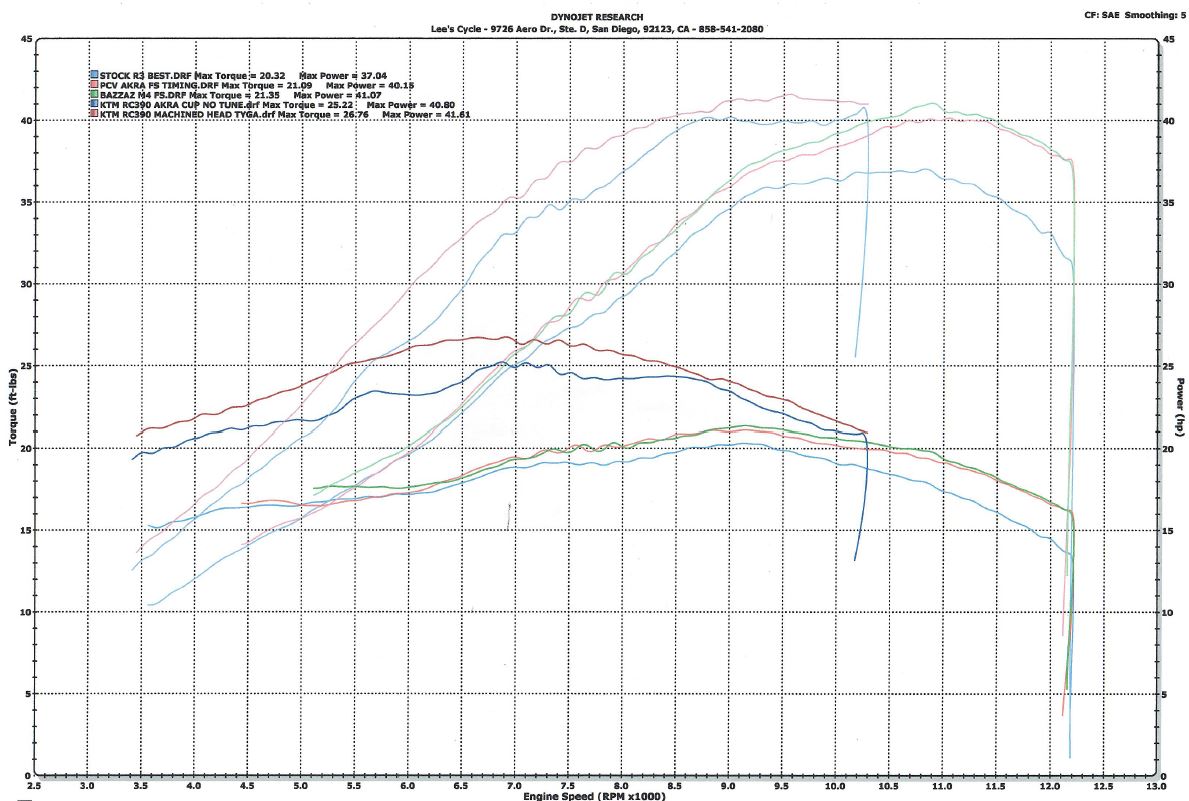
These two bikes have seen plenty of battles on paper and on the track, so I’ll share some numbers I came across while doing all this work. This KTM was a RC390 cup bike with cup spec exhaust, and the owner eventually removed the cup restrictions and changed the exhaust and retuned it. I happen to know the owner and got ahold of his dyno results with both exhausts so I could compare the KTM to my R3 once both bikes were properly unrestricted. This first chart shows the KTM in a few different stages. I know from other testing, that the KTM RC390 cup bike version does almost exactly 38.0 HP. The bike in this test started as a cup bike, then the head was milled, and throttle restriction removed. At that point, it recorded 40.80 HP when still using the cup exhaust and no fuel tuning. This is pretty close to the 40.50 recorded by Motor Cyclist Online in their test of a stock KTM RC390 street version. Once tuned with a PCV, it increased to 42.50 HP, but the curve is a little rough with the cup spec exhaust. With a new Tyga full system installed (which removes the catalytic converter) and no fuel tune, the power dropped to 39.07, but once tuned with the Tyga full system, the power was back up to 41.61, but with a much stronger power curve everywhere, just without the little peak up over 42 that was present with the cup bike exhaust.
This second chart shows the KTM RC390 results from above with the cup bike exhaust and no tune (pretty much a stock bike, and close in power to the stock bike that Motor Cyclist tested in chart at the start of this article which did 40.5) as well as the fully tuned Tyga system and compares it to the results from my Yamaha R3 in stock trim, as well as with the M4 full system and Bazzaz Z-Fi and Akrapovic full system and PCV. The KTM has a pretty good power advantage on paper when both bikes are in stock trim, but when both bikes are properly setup, the KTM doesn’t gain much up top, and only picks up a stronger roll on and smoother curve. The R3 really closes the gap on the top end, but the KTM has more torque and should pull harder off the corner. I would say it becomes difficult to say who has the power advantage in the end and will be more up to rider skill on the particular track to utilize either machine to it’s fullest. This matches up pretty good to what we are seeing on the race track.
Yamaha R3 Superbike Upgrades
Since the release of the Ninja 400 in 2018, small bike racing has been pretty disrupted. Classes that were once full of highly competitive R3s, Ninja 300s, and KTM 390s, were thrown together with the new Ninja 400, which was clearly in a class of it’s own, making upwards of 46hp in stock trim. I spent a lot of time this past fall and winter working on different superbike kit parts for the R3, partially because it’s awesome, and partially because I wanted to see what it really took to make the R3 competitive with the Ninja 400. I wanted to see if there was a reasonably affordable and reliable build that would get there. So guys like you and me who have already invested a ton of time, energy, and money into a really well built R3 that we love, don’t have to switch platforms to stay competitive. So here we go, here’s my journey. I’m going to show you what sort of performance changes you can expect from various upgrades like ram air, velocity stacks, cams and cam timing, cylinder head porting, and boring throttle bodies for more air flow. All of these exact modifications used are available for purchase here on this site. Again, for consistency sake, and to keep costs reasonable for everyone, all of these tests and builds are done with 91 pump gas. Expensive race gas can improve performance even more with any of these setups.
Ram Air
There’s a few different versions of bodywork with ram air circulating around Asia and Europe. These are two of them:
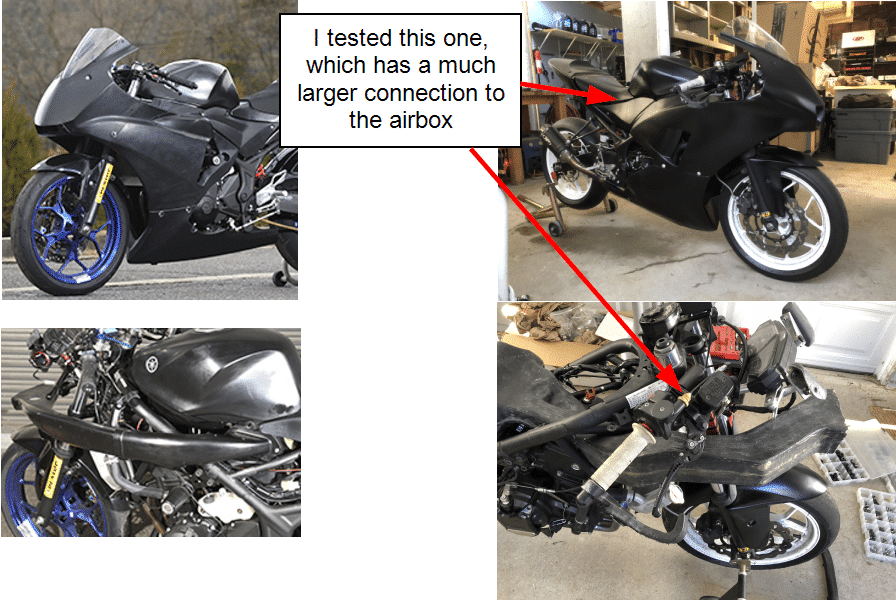
I got ahold of the one on the right to test (that’s the bodywork and ram air installed on my bike). It looked reasonably well designed. Unfortunately, this test was pretty early on in my superbike development, so I only tested it with the stock engine and stock velocity stacks. Compared to the same setup but just with a modified airbox with the sides cut open, results were disappointing. Connecting the ram air and modified airbox on the dyno, even with a pretty good air flow directed into the ram air, only resulted in a loss of power and richening of the AFR, indicating that air supply was worse than by just cutting open part of the airbox. The only way to bring performance up, was to stick a 150 MPH leaf blower directly into the ram air’s intake, and even then, this only brought performance back up to be even with the performance by just cutting open the stock airbox without ram air, nothing was gained. I don’t have any good dyno results to display this visually, sorry. I have some theories about why this system didn’t work well, but I don’t know for sure. I didn’t get to do much testing on it, and I never got around to testing it further with any of my superbike upgrades. I was thinking about going back and testing it again, but the system won’t fit with the 2019’s different fuel tank, so for now, no positive improvements with ram air and the R3, at least not with a stock engine.
Airbox / Velocity Stacks
Once you optimize exhaust air flow with one of the full system exhausts listed above, the other big restriction of the stock R3 is the airbox. The airbox is sealed up with only a small rubber “snorkel” to the outside to feed the engine.
The OEM velocity stacks, or “air funnels” inside the airbox are designed with entry level street riding in mind, and designed to provide a smooth power curve to the heavily restricted stock Yamaha R3 from idle to the bike’s peak power at about 10,500. However, on the race track, we don’t care so much about the area from idle to 9,000 rpm, and are much more concerned with the power above 9,000 rpm. Let me give you a quick explanation of what velocity stacks do. They essentially have two functions.
First, the bell shaped mouth of a velocity stack smooths the airflow from the outside air or airbox into the throttle body, reducing turbulence, and allowing more air to flow into the engine.
The second thing they do is quite amazing. You see, air flow into the engine is not a steady flow. Every time the intake valve opens, air is quickly accelerated and forced into the cylinder by the higher pressure in the airbox, and then when the valve slams shut, the air quickly stops and compresses and a shockwave reverberates back to the airbox, sending some air and fuel back toward the airbox with it. Then the valve opens again, and low pressure in the cylinder causes air to be forced back toward the cylinder until the valve slams shut again. This back and forth movement and expansion and contraction of the air in the intake has a resonant frequency based on the length of the intake tube from the valve to the end of the velocity stack. When the opening and closing of the intake valve (based on engine RPM) matches this resonant frequency, or an octave of this frequency, you get a little extra air shoved into the cylinder because the air is already flowing toward the cylinder when the valve opens, instead of flowing away from it. In between these octaves, you get a reduction of air flow because the air is moving away from the valve when it opens and must quickly change direction. So changing the velocity stack length, actually changes the intake tube length, and essentially tunes the intake air charge to certain RPM frequencies. This “tuning” of the intake charge that occurs with velocity stacks is why you typically see staggered length velocity stacks in stock bikes. The stacks are staggered to offset the tuning boosts in power so when one cylinder is getting extra air and making more power, the other cylinder is getting reduced air and making less power and you end up with a smooth power curve instead of the stair stepped power curve you get with two equal length velocity stacks. Furthermore, this is why tuning is different in each cylinder in a bike with staggered velocity stacks. Each cylinder requires different amounts of fuel at different times to match the resonance of air flow created by the different velocity stack lengths.
Typically modifying the airbox or flow through this snorkel is illegal for Superstock or Supersport race classes, but if you are not racing, or racing in Superbike type classes, this is the next place to look for extra power without spending a fortune. You’ll want to free up air flow into the airbox before making changes to the velocity stacks. You can do this by cutting out large portions of the airbox, and/or removing the snorkel:

However, just like changing the exhaust, modifying the airbox or velocity stacks to increase air flow means you will need to adjust fueling to match or you will likely lose power instead of gain.
I tested countless different iterations and combinations of velocity stack length and shape to come up with the setup that I found to have the best power curve. What I found is that the shorter OEM velocity stack ended up being perfect to use for one cylinder, and when paired with my own designed shorter velocity stack, provided an excellent power curve for track use, that was actually smooth enough in the lower RPM ranges to use for street riding as well.
Along the way, while testing various velocity stack setups, I did a comparison of the different exhausts with a modified airbox and velocity stacks to see how the increased air flow worked with the different exhausts. Again, each system was tuned in the ECU to match the new velocity stack setup. This engine is still completely stock. There is a small difference in power between the top exhausts, with the Arrow excelling in the very peak but suffering on torque, the Graves making the most torque with a very close second in peak power, and the Akrapovic Carbon in the middle with good torque and peak power. The M4 again is down slightly everywhere above about 10,000 rpm, and the SC Project with no baffle isn’t even close, but is by far the loudest exhaust in the test.

I also weighed each of these top exhausts so you could get a feel for the real trade off. The Graves system was my favorite, and the top performer, but it weighs 2 lbs more than the rest. The full titanium Arrow and M4 of course weighed the least, but the titanium headers add a few hundred bucks to the cost. The Akrapovic with it’s carbon fiber muffler is a pretty good balance of cost, performance, and weight. So up to you guys on that one, I’m going to run the Graves Works 2 on my bike, and use it for most of the testing going forward.

In this next chart, you can see the difference between the bike with just the exhaust and the stock airbox, and with the exhaust and modified airbox/Vstack setup. You can see that while changing the velocity stacks alone doesn’t have a huge effect on the peak HP number, it does change the power curve and drag the power band higher into the rev range, sacrificing some low end torque from 8,300-10,000 RPM, for top end horsepower above 11,000. This is why manufacturers use the setup they do for street use, it’s smoother and makes good torque in the lower RPM range, but on the race track with an R3, we generally never let the RPMs drop below 10,000, and above 10,000, you can see that the modified velocity stacks have a huge advantage in what we call the area under the curve. That is, the increase in useable power through the power band all the way to redline, where the stock setup falls off pretty fast above 11,500.

High Performance Camshafts and Cam Timing
The next place I want to talk about to increase performance is the camshafts. Cam timing and cam size and shape can be altered to further boost power and change the power curve. The engineering that goes into cam design is pretty extensive and you can spend a lifetime learning and talking about it so I’m just going to skip over the nitty gritty and get to the fun part. Increasing cam lobe size and duration generally allows more air and fuel into the cylinder per cycle and can boost your entire power curve pretty impressively. The better the cams are designed, the more increase you can get. Here are some runs with higher lift and duration cams dropped into the same engine and fueling adjusted to match, again, 91 pump gas. The dark blue line uses the stock intake cam with a mildly larger exhaust cam, the yellow line uses a much larger intake and exhaust cam. This is only a small taste of the work I did, I actually tested and collected data from a pile of different cams before settling on the best performers to offer in our two Superbike kits.

Changing camshaft timing can further shape the power curve. Moving the lobe centers farther apart typically creates more peak power, and moving them closer together typically creates more torque. Finding the perfect balance is a tuner’s art and extremely time consuming, so I’m not going to discuss specifics publicly, sorry. If you want my cam timing, you can buy my Norton Racing camshafts in one of our kits, which will ship pre-timed to my specs for your engine ready to drop in. But, I will show you what happens to a power curve when you change cam timing:

Cylinder Head Porting
Porting the cylinder head refers changing the size and/or shape of the intake and exhaust ports that connect the valves to the exhaust and intake boot/throttle body. Or in cases where the size and shape aren’t affected much, the rough casting surfaces are smoothed. Bigger isn’t always better, and optimizing the port shape and size requires a flow bench and is another art in itself that I don’t know enough about, but I’ve teamed up with some top guys to create a port shape and design for the R3 cylinder head that has proven to be extremely efficient and effective on the dyno. Porting a cylinder head is all about increasing the amount of air that can get in and out of the cylinder with each cycle. Intake ports of the head are also matched to the intake boot shape and size and valve seats are recut with a specific high performance cut to increase flow. Our Superbike head also has material cut from the cylinder head face to increase compression as high as we felt comfortable with 91 pump gas, with the stock pistons. After dyno testing to prove we had an awesome head, we had this head digitized, and CNC duplicated so that anyone purchasing our Superbike CNC Ported Head Kit will receive an optimized, exact copy of this ported cylinder head and our spec cams, pre-timed with adjustable cam gears. Technology is awesome. Here’s what happens when you increase airflow by porting the head:

So What the EFF is up with that big dent in the power band right at the peak torque??? I was wondering the same thing for while, and tried a lot of things with velocity stacks and cam timing to see if I could change this, but it turned out, this was an air flow problem. Once the head was ported, airflow was increased across the entire power band, except at this point, where the most work is being done (the engine is doing the most work at peak torque, not peak HP) and the engine needed more air but the throttle body was choking it. We were basically maxed on the amount of air the throttle body could flow with this displacement once we optimized the cams, so even though the new ported head could now flow more air, the throttle body could not, and we get this big dip in the curve. How do we fix that? Bore out the throttle body! There isn’t a ton of material on the stock R3 TB to cut away, but removing what we can goes a long way when you’re starving for more air. Once upgrading to our bored TB and allowing more air into the engine and sending more fuel in with it, this is what happens:

At this point I was thrilled with this power curve! The bike makes peak torque just past 10,000 rpm where you are accelerating off the corner and pulls hard all the way to red line. However, I was starting to encounter some other problems. The bike was getting more and more difficult to tune to run smoothly the more I squeezed out of it. Fueling was really touchy and I was often getting hesitations as I rolled the throttle on doing these tests. The limitations of flashing the stock ECU were starting to show. Also, despite making great power, the engine was running lean from 10,000-12,000 rpm and attempting to add fuel made no change. This meant that the fuel injectors were already operating at 100% duty cycle. I knew there was a little more power in the engine if I could give it more fuel, and I had a new extreme cam design specifically for this ported head that showed great promise, but again, would need more fuel to take advantage of. If you aren’t familiar with how fuel gets into the throttle body, here you go:
The fuel pump in the gas tank operates nearly continuously when the bike is running. It pressurizes the fuel line to a certain PSI, then excess fuel bleeds off back into the tank through a blow off valve. Fuel gets into the intake through the injector, which is just an on/off valve that opens for a certain length of time, then closes. It does this every cycle of the engine. As the ECU asks for more fuel (by opening the throttle or tuning changes), it sends a signal to the injector “valve” to stay open longer, and close for a shorter period before opening again for the next cycle. But once you reach 100% duty cycle, where the injector is open constantly and never closes, then amount of fuel flowing through is limited by the fuel pressure and size of holes in the injector, and not by the signal going to the injector from the ECU. When you are out of injector duty cycle and still need more fuel, you have to change something. You can modify or replace the injectors so that they flow more fuel. Or, you can modify or replace the fuel pump to increase fuel pressure in the line. Both of these options will cause more fuel to flow for each cycle the injector is open. There are pluses and minuses to these options, and after trying and failing miserably with higher flow injectors (couldn’t get the bike to run well at all), I elected to modify the fuel pump. This took a bit of work and a few tries but I was eventually successful and able to tune the bike again with just enough duty cycle to spare.
Up to this point, I had been doing most of my tuning inside the ECU with Flashtune, since I needed to fine tune each cylinder to maximize performance with my staggered velocity stack lengths, and to keep each cylinder in the optimal AFR so I didn’t overheat one cylinder. I wanted to create a SBK/tuning package that was as close to drop-in as I could, and if possible didn’t always require custom tuning if a person was running the same components as this build. But, when I ran out of duty cycle, this changed things a bit. The downside to modifying the fuel pump, is that it will be difficult to get the fuel pressure to be the same from one bike to the next, which will change the fueling for each bike and likely require custom tuning each bike. It’s a tremendous amount of work to custom tune this bike with separate tuning for each cylinder using Flashtune, and as I mentioned before, the R3’s fueling is very sensitive and was really getting worse the more power I made. Now that I’ve tuned this bike over and over again, it’s getting increasingly time consuming and difficult to get the fueling really smooth by flashing the stock ECU. It just didn’t seem feasible to offer a bitchen superbike kit that would require hours and hours of custom ECU tuning to run well. I needed a better solution. Along the way working with the R3, I’ve dabbled with the aRacer Super RC2 ECU a few times, with some success, but some limitation and a huge learning curve.
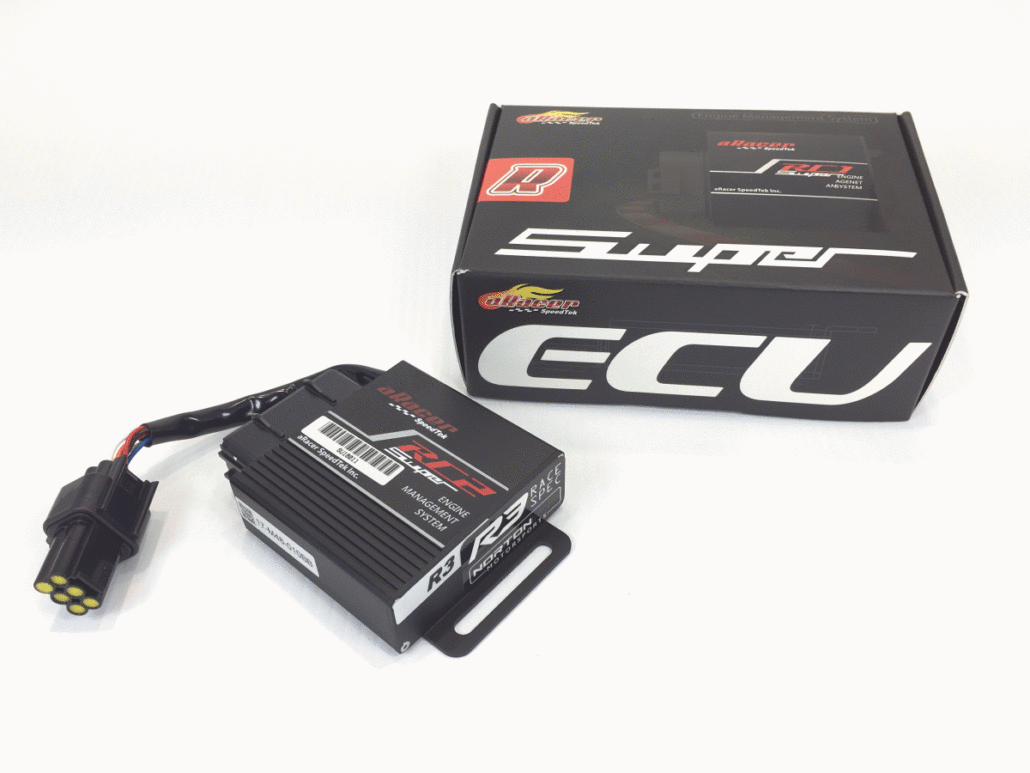
This fully programmable race ECU is extremely powerful, but uses a slighly different tuning language than I’m used to, so getting it optimized for the R3 has taken some time. By reading MAP pressure along with other things, tuning done with the aRacer ECU was supposed to be much more accurate, and provide smoother throttle response across the board. The autotuner is also far more accurate than piggy-back autotuners and was the first one I felt could be trusted reasonably well when not used on a dyno. I decided to give it one more best effort to learn and apply the new language to get the results I wanted with the aRacer, I knew if I could wrangle it, the rewards would be worth all the time invested. I installed and timed my newest prototype superbike camshafts and reached out to Kae Chang, the aRacer USA rep to come for a visit. The two of us spent a long night on the dyno to try to work through some of the issues I was having. We made some progress and it gave me enough info to push ahead myself, but I still had more to figure out and a lot of trial and error ahead. I ended up spending another 4 full nights (I’m talking like 6pm-4am long nights) and finally had a couple breakthroughs that opened up the capabilities of this tuning system. And just as I had hoped, the fruits were completely worth it. WOW! It all fell into place. The new cams allowed the engine to breath deeper through the ported head and bored throttle bodies and the bike just came alive! I actually had to tighten the straps on the dyno because with this change, the rear tire was slipping on the drum!

The aRacer RC2’s ability to fine tune fueling through MAP pressure signal rather than TPS made a noticeable difference in performance and once I had it figured out, was so much easier to tune. I went back and forth with the aRacer ECU and flashing an OEM ECU to check performance, and I was struggling to get the curve as good with the flashed ECU with all of the changes. I may have been able to get there eventually, but the aRacer was smoother and more consistent, I can’t wait to actually ride it! I suspect it will be much easier to adapt this fuel mapping to different bikes than with the flashed ECU, and without the hesitations and sensitivity of flashing the stock ECU. Here’s what was happening with the flashed ECU vs aRacer ECU. The ramp up to peak was getting really difficult to dial in with the flashed ECU, but look how buttery smooth the aRacer’s curve is:

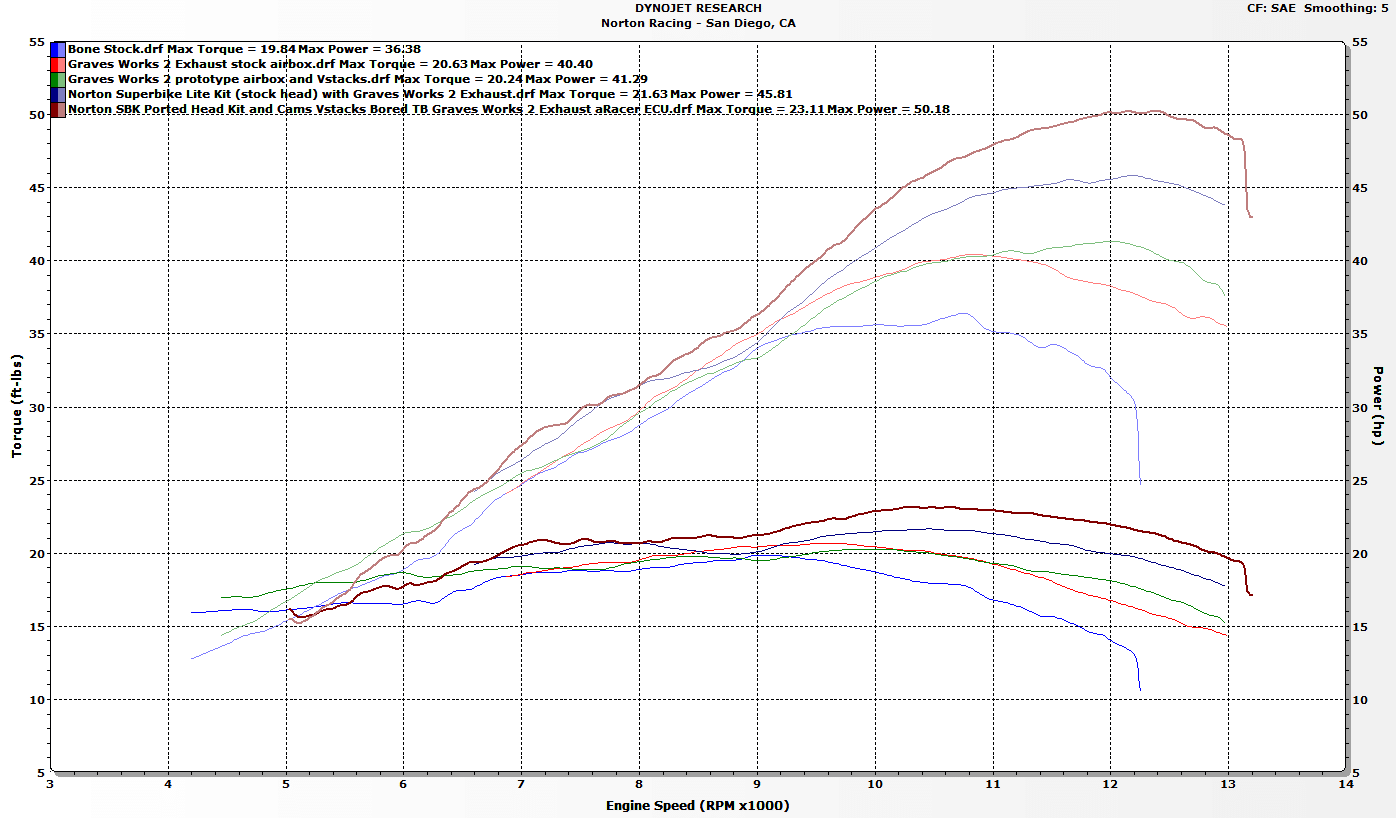
As I mentioned before, part of this journey was to see what was involved in bringing the R3’s performance up to par with the Ninja 400, and could it be done without spending $10,000 on a full high compression superbike engine and $30/gallon fuel. While I was in process with all of this, Yamaha officially released their own kit to be used in WSS300 and MotoAmerica Junior Cup in an attempt to even out performance with the Ninja 400, but these classes also restrict the Ninja 400 to bring it’s performance down. Since club racing Ninja 400s won’t be restricted, I was hoping to get a little more performance from my kit than Yamaha did. The full Yamaha GYTR kit includes cams, valve spring shims, their own velocity stacks (2 equal stacks that are very short), thin head and base gaskets, and high compression pistons. I’ve had a chance to do some work with these kits as well and it was interesting to see what Yamaha did with it. Yamaha doesn’t include any considerations for tuning, so additional tuning is required for the kit, which I did in the ECU with Flashtune. Since the stock head and throttle body have their limitations, I think Yamaha tried to maximize output leaving these things alone, so everything would be bolt on, rather than porting heads or boring throttle bodies. I think they did a good job maximizing output from the stock head given the limitations of air and fuel in the stock throttle body, but you can see how my kits differ. Without the high compression pistons and gaskets, our kits are similar (velocity stacks and cams), simple to bolt on to an engine. But my Superbike Lite kit with my staggered velocity stacks makes a lot more torque than the short Yamaha kit stacks, and you can see the nasty stair step in the midrange from Yamaha’s kit that’s result of running equal length stacks. Once you remove the head and open the engine to install high compression pistons and gaskets, the Yamaha kit does much better at the top end. But they probably couldn’t get much more torque because of the lack of flow with the rest of the stock system. Since I didn’t have to keep the rest stock, I figured, if I’m going to ask a customer to remove the head and open the engine to replace pistons, they might has well install a ported head which, as you can see, unlocks a much a bigger performance boost than just pistons. And then, by doing a couple other supporting mods at the same time, I’m able to squeeze a lot more from the engine with my full Superbike CNC Ported Head kit than Yamaha did with theirs. Pretty interesting stuff:

I think I was pretty successful and a 50HP R3 will definitely give even an unrestricted Ninja 400 a run for it’s money, that’s great! We’ll see for sure when I get this thing back on the track against some fast 400s!
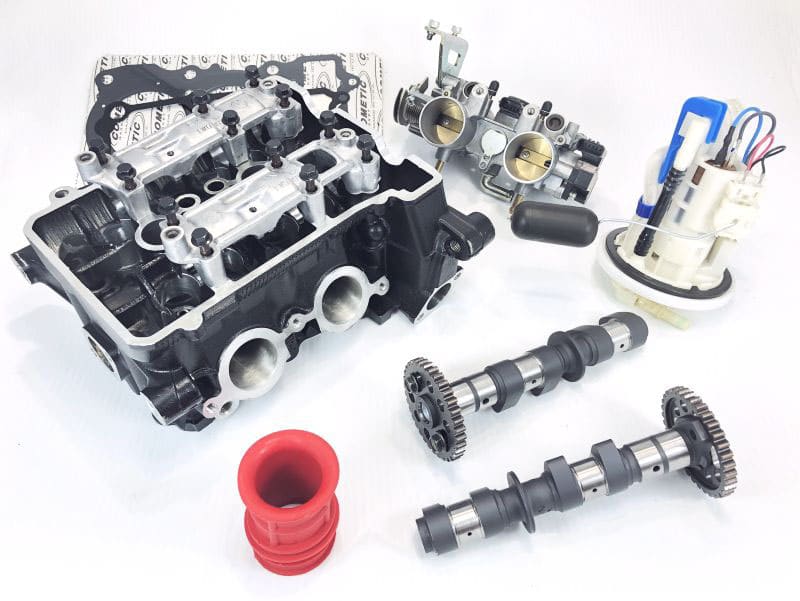
That’s about it folks. Without getting into expensive bottom end modifications, higher compression requiring expensive fuel, or overboring the R3’s 68mm cylinders to 70mm, I’m pretty happy about the amount of power I’ve squeezed out of this robust little engine. This full build is now available with all of the best parts from all of my testing here in my Norton Racing Full Superbike CNC Ported Head Kit:
I also definitely recommend using the aRacer Super RC2 for any R3 superbike builds like this, it’s an amazing system with capabilities and data collection that far exceed it’s cost.
As for what’s the best exhaust, there’s some subjectivity in the answer, but I’ll be using the Graves Works 2 system on my bike and our team bikes for now. It consistently performed at the top with solid peak power and better torque than the rest. If highest performance isn’t your ultimate deciding factor, there are some other great options for bang for your buck if you like a different look. The Akrapovic carbon, Arrow Evo 2 (in Stainless Steel or Titanium), or even the original M4 Stainless Steel or M4 Works Titanium, which is still a great exhaust for the money and includes all the little accessories you’ll need for installation, like a hanger bracket, which the Akrapovic does not include.
There’s always more power, but I’m going to call that finished for now. Here’s the whole story of progress in one shot, pretty awesome stuff:

About Norton Racing
What you can read next
21 Comments to “ Yamaha R3 / MT03 Exhaust Dyno Test and Superbike Build”
You must be logged in to post a comment.

Thanx for the update. The numbers are a li’l bit smaller than I expected, but it’s still nice to see them. Thanx for all the work you’re putting into this bike for us, Jesse.
Yeah, they’re a bit lower than I expected too, since Cycleworld just tested the bike stock at 36.8, but it’s all relative. Every dyno will measure slightly different and be calibrated slightly different. Plus weather, temperature, elevation, etc. all affect readings. The important thing to look at are the power and torque curves, and the percentage gains. We measured a 6.4% gain over stock with a full system and Bazzaz tuning. So if Cycleworld measured the bike at 36.8 HP on their dyno stock, I would expect them to see 39.2 HP with a full system and Bazzaz Zfi.
Hi there to every body, it’s my first pay a visit of this weblog;
this webpage carries remarkable and really fine stuff for visitors.
Hi,
Does removing the airbox snorkel provide any gains?
Thanks
Joe
While I haven’t tested this to provide actual numbers (I will soon), removing the snorkel should allow a little more air flow and allow a slight gain with added fuel
Whats up J did you ever find out or test the the difference with and without the db killer installed? The sound is awesome with it removed….just wondering if it hurts performance either way
I haven’t had a chance to tune and test both ways, but I will, and I’ll post up the results.
Did you get to test the New Akra, racing line carbon for the R3? Really interested to know how this fairs with M4 full exhaust and the arrow Pro Race Exhaust with Arrow Racing collectors.
https://www.akrapovic.com/#!/motorcycle/products?brandId=41&phaseId=2
I have not tested the new Akra yet.
Jesse
This is really good information! I’m building a R3 to race endurance and the information here has saved me a ton of research time! Thank you for sharing!
Great extensive research, thank you for this. I am just getting started on upgrading a used 2015 I just purchased and I am using your write-up to make my selections. Have any of your thoughts or conclusions changed since a year ago?
Shoot me an email, let’s chat before you make your decisions. I’m happy to help.
jbluetooth@gmail.com
Do you guys have any suggestions for increasing the some power of 2016 R3 please suggest me.
a full exhaust such as the M4 full system exhaust and a fuel controller like the Bazzaz or Power Commander will add about 10% more power and torque.
With at k&n filter insert and a full akraprovic gp system i used ecu flash and a Custom mapping my mt-03 16 did 39.10hp on the dyno. I can say when you fix the air/foul ratio its like a new engine with a way smoother run.
This sounds about right. We have been testing a race ECU and our own ECU flash which will be available on the site very soon. Results are around 40-42hp with the M4 full exhaust and 91 pump gas.
Hello Jessie, will picking up a Ninja 400 in a couple of month’s and want to get into racing at Chuck. Been tracking a Triumph RS and GSXR-750. Tires get expensive and going to the Ninja 400, should be a little on maintenance. Are you going to be doing testing on the 400? The other bikes are stock.
Thanks
Joe
maybe at some point, but still have a lot of work to do first.
Nice write up Jesse! I’ll have to give it a more thorough read again later but I like what I see so far. Very interesting to see not only all your work, but how the various exhaust systems have changed since the original batch of tests.
I might just hang on to this little bastard a while longer, now.
Nicely done Jesse with the testing and documenting the progress. Thank you for sharing the knowledge.
This is simply amazing man..i am looking out for some mods for an Rc390 and a small R3 to race a small championship in central america…any tip is appreciated and tjanks for sharing all this…keep it up!!