SIGN IN YOUR ACCOUNT TO HAVE ACCESS TO DIFFERENT FEATURES

FORGOT YOUR PASSWORD?

FORGOT YOUR DETAILS?

AAH, WAIT, I REMEMBER NOW!
(858) 842-4595
  • Policies
  • My Account
  • LOGIN

Norton Motorsports

  • Shop by Bike
    • Aprilia
      • Tuono 660 2021+
      • RS 660 2021+
      • Close
    • KTM
      • RC390 / Duke 390
      • Close
    • Kawasaki
      • Ninja 250 / 300
      • Ninja 400 2018+
      • Ninja ZX-4RR 2023+
      • Z400 2019+
      • Kawasaki Ninja 500 2024+
      • Close
    • Ohvale
      • GP-0
      • GP-2
      • Close
    • Yamaha
      • MT-03 2020+
      • MT-07 / FZ-07 2015-2017
      • MT-07 2018-2020
      • MT-07 2021+
      • R3 2015-2018
      • R3 2019+
      • R7 2021+
      • Close
    • Suzuki
      • Suzuki GSX-8R
      • Close

    • View All
    • Close
  • Norton Built Motorcycles
    • Norton Racing Hotbodies GP Spec Race Bodywork Kit - Kawasaki Ninja 400 Z400 Ninja400R main Norton Motorsports GP Spec Kawasaki Ninja400R
    • 2019-04-28 18_00_05-2018 Ninja 400 Race Motorcycle from Ninja400R.com Norton Motorsports Kawasaki Ninja400R
    • 2019 yamaha yzf-r3 race bodywork Hotbodies Racing Norton Motorsports Norton Motorsports Race Spec Yamaha R3
    • IMG 2548 Edit Norton Motorsports Kawasaki Ninja ZX4RR Race Motorcycle
    • Close
  • Apparel, Gear, & Tools
    • Apparel
    • Riding Gear
    • Tools
    • Close
  • MY CART
    No products in cart.
  • Bike Build Write-ups
    • Aprilia RS 660 2021-
    • Kawasaki Ninja 400 2018- / Z400 2019-
      • Important ** Kawasaki Ninja 400 / Z400 Critical Issues
      • Top5 *** Top 5 Kawasaki Ninja 400 / Z400 Mods and Upgrades
      • Do you need a fuel controller with full exhaust ninja 400 Do you need a Power Commander for full exhaust on the Kawasaki Ninja 400?
      • featured image How to install an R6 throttle tube in the Kawasaki Ninja 400 / Z400
      • 49899087_301487663905591_4918556926305894400_n How to remove the front fender and rear fender of the Kawasaki Ninja 400
      • 2019-02-07 10_57_46-Clipboard How to remove the gas tank on the Kawasaki Ninja 400
      • IMG_4330_2 How to remove the OEM bodywork of the Kawasaki Ninja 400
      • open clutch Kawasaki Ninja 400 / Z400 (Ninja 500 / Z500) Clutch Slipping, Poor Shifting, False Neutrals, and Dropping Gears – Explained and Fixed!
      • Kawasaki Ninja 400 dyno horsepower Kawasaki Ninja 400 Exhaust Dyno Shootout!
      • CVR_3132_Sep1519_CaliPhoto Ninja 400 Electronics and GP Bodywork Test
      • Traxxion Dynamics Omni Fork Spring Kit Yamaha R3 2015-2018 Suspension Spring Rate Chart for Kawasaki Ninja 400 / Z400
      • Braketech Vs Galfer Rotor Brake Test Rocco Landers What’s up with the Kawasaki Ninja 400 / Z400 brakes?
      • Close
    • Ohvale GP-0 / GP-2
      • Important ** Ohvale GP-0 / GP-2 Critical Issues
      • OV001 Ohvale 190 5 Speed Shift Star Cap Ohvale 190 False Neutral and Miss Shift Problems – FIXED!
      • Close
    • Yamaha R3 2015-2018
      • Important ** Yamaha R3 / MT-03 Critical IssuesJanuary 24, 2021
      • Top5 *** Top 5 Yamaha R3 / MT-03 Mods and UpgradesJanuary 24, 2021
      • Yamaha R3 Annitori Quickshifter QS Pro Annitori Quickshifter QS Pro installed and beta tested on Yamaha R3June 24, 2015
      • Yamaha R3 415 chain kit horsepower Dyno tested: 520 vs. 415 chain and sprockets – Yamaha R3February 14, 2016
      • IMG_3869 How to bleed the brakes or flush the brake fluid on the Yamaha R3 / MT-03September 7, 2015
      • IMG_3896 How to change the front brake pads on the Yamaha R3 / MT-03September 11, 2015
      • R3GPShift How to change the Yamaha R3 / MT-03 to GP ShiftSeptember 7, 2015
      • DSCN2608_zpsqza81eb3 How to do an oil and filter change on the Yamaha R3 / MT-03August 16, 2015
      • IMG_3857 How to get more dash clearance for your clipons and brake line – Yamaha R3August 28, 2015
      • IMG_3630 How to install a BMC Race Air Filter in the Yamaha R3 / MT-03August 8, 2015
      • IMG_3846 How to install a stainless steel braided front brake line on the Yamaha R3 / MT-03September 7, 2015
      • img_6102 How to install a Yoyodyne slipper clutch in the Yamaha R3 / MT-03December 10, 2016
      • topdown vortex clipons How to install aftermarket clipons on the Yamaha R3 / MT-03March 26, 2016
      • IMG_4189 How to Install Hotbodies Race Bodywork on the Yamaha R3May 7, 2016
      • IMG_3965 How to install the Traxxion Dynamics Fork Damper Rod kit with Cartridge Emulators in the Yamaha R3 2015-2018January 16, 2016
      • IMG_4511 featured How to remove the emissions systems and install a block off plate on the Yamaha R3 / MT-03August 16, 2015
      • DSCN2484_zpsuqljyccu How to remove the front wheel from the Yamaha R3 / MT-03August 2, 2015
      • How to remove the fuel tank from the yamaha R3 How to remove the gas tank from the Yamaha R3April 23, 2015
      • IMG_3927 How to remove the kickstand from the Yamaha R3May 7, 2016
      • DSCN2189_zpsg2hs8ooe How to remove the rear wheel from the Yamaha R3 / MT-03August 2, 2015
      • Remove Side Fairings Yamaha R3 How to remove the side fairings from the Yamaha R3May 23, 2015
      • IMG_0167 How to remove the tail and taillight of the Yamaha R3April 21, 2015
      • how to remove the windscreen yamaha r3 How to remove the windscreen and upper fairing from the Yamaha R3May 4, 2015
      • IMG_3985 How to replace the fork seals on the Yamaha R3January 16, 2016
      • IMG_3719 Installed: Hotbodies Color Form Race Bodywork – Yamaha R3 2015-2018August 26, 2015
      • Yamaha R3 Modified rear brake rotor, lightened machined rotor Lightweight Rear Brake Rotor for Yamaha R3October 1, 2015
      • IMG_4463 Paint is done, heading to 5zero4 Designs next weekend to install the graphicsDecember 14, 2015
      • Traxxion Dynamics Omni Fork Spring Kit Yamaha R3 2015-2018 Suspension Spring Rate Chart for Yamaha R3 / MT-03January 24, 2021
      • Yamaha R3 Woodcraft 1.5 rise clipons What are the best clipons for the Yamaha R3?March 24, 2016
      • yamahaR3_raceconcept_rearsets_gold_fitR1 What are the best rearsets for the Yamaha R3?March 26, 2016
      • Yamaha R3 Exhaust Test Superbike Dyno horsepower Norton Motorsports Yamaha R3 / MT03 Exhaust Dyno Test and Superbike BuildJune 6, 2019
      • 2015 yamaha r3 exhaust header muffler weight Yamaha R3 OEM exhaust weight, headers, muffler, slip-on, heat shieldJuly 3, 2015
      • Close
    • Close
  • Dyno Testing
    • Aprilia RS660 Dyno Testing
    • Kawasaki Ninja 400 / Z400
      • Kawasaki Ninja 400 dyno horsepower Kawasaki Ninja 400 Exhaust Dyno Shootout!September 2, 2019
      • Do you need a fuel controller with full exhaust ninja 400 Do you need a Power Commander for full exhaust on the Kawasaki Ninja 400?September 2, 2019
      • Close
    • Yamaha R3 / MT-03
      • Yamaha R3 415 chain kit horsepower Dyno tested: 520 vs. 415 chain and sprockets – Yamaha R3February 14, 2016
      • Yamaha R3 Exhaust Test Superbike Dyno horsepower Norton Motorsports Yamaha R3 / MT03 Exhaust Dyno Test and Superbike BuildJune 6, 2019
      • Close
    • Yamaha R7 / MT-07
    • Close
  • Other Cool Stuff
    • Power Commander vs Bazzaz vs ECU Flash vs aRacer Race ECU Power Commander vs. Bazzaz vs. ECU Flash vs. aRacer Race ECU
    • Woodcraft Toe Guard Yamaha R3 Woodcraft Shark Fin Toe Guard Modification Yamaha R3 / Kawasaki Ninja 400
    • Track_Day_TTD_2015_Thompson_8-24-15-2195-sm-300×200 5 Reasons Why Roadracers Give Up Street Riding
    • modified rear brake rotor rev a Reducing weight on a race bike and the different types of weight
    • video thumb Tire Shootout for Small Sport Bikes by Ari Henning
    • IMG_5091 Race Bike Designs, Graphics, and Paint Jobs
    • thumb Kawasaki Ninja 300 vs. KTM RC390 – Video Review
    • Close
  • Press Release
  • Race / Ride Reports
  • Race Team

How to do an oil and filter change on the Yamaha R3 / MT-03

by Norton Racing / 2015, August 16 / Published in Yamaha R3 / MT-03

This is another great writeup by my friend mfgchapin over at R3-Forums.com.  Thanks!

There’s a lot of debate on how to break in a bike, what brand oil to use, what weight, mineral, semi-synthetic or full synthetic, but the one thing that’s not debatable is changing your oil and filter often will guarantee a happier and longer-lived engine.  It’s easy and relatively cheap, so read on.

Tools & Supplies Required:
Gloves (seriously, these are necessary, cancer sucks)
12 mm socket
17 mm socket (if using a K&N filter)
4 mm Allen wrench
Oil filter wrench or Phillips screwdriver to hammer into the side of the filter
Oil catch pan
Replacement drain plug crush washer
2.5 quarts of oil new oil
Funnel
Replacement Oil filter
Torque wrench

First off, I like to do all my work on a rear stand.  It’s not totally necessary, but it’s more stable and I prefer the bike to be upright.  It’s especially nice for this job since the oil drains easier.

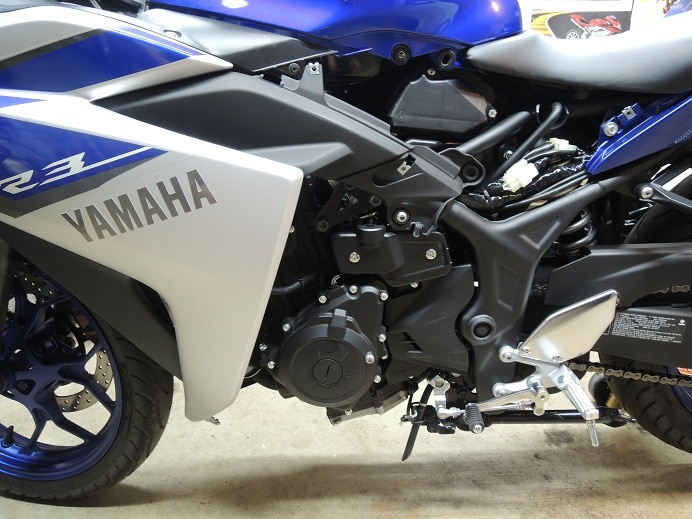
You can actually do this without taking off any fairings, but I find the work area a little cramped.  Taking off the left fairing only adds about 10 minutes to the job and gives you a lot more room to work with.

Step 1:  Start with the trim piece under the seat.  The 2 bolts come out with a 4mm Allen, then it pulls out of the rubber grommets.

DSCN2620_zpsldq6qvyo


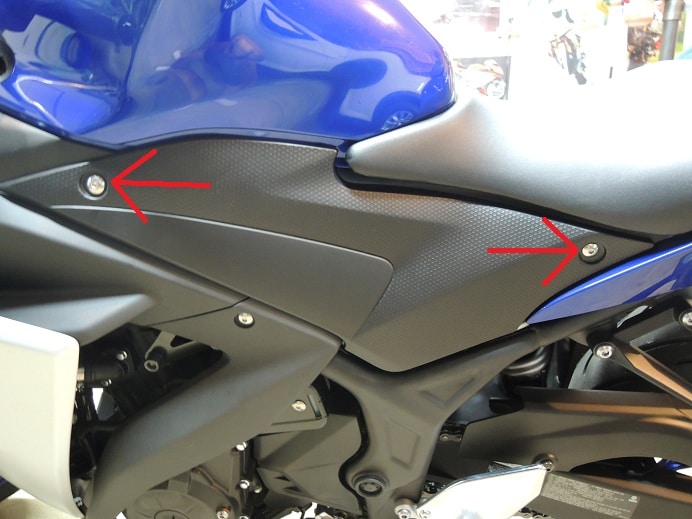
Step 2:  Move on to the lower fairing, where 3 bolts come out with a 4mm Allen.  The Japanese love to fit fairings together with hooks and tabs, so be careful not to break them when you’re pulling off the lower. Start with the upper portion of the fairing by pulling down and away out of the hook.

DSCN2618_zpsjngojvv4


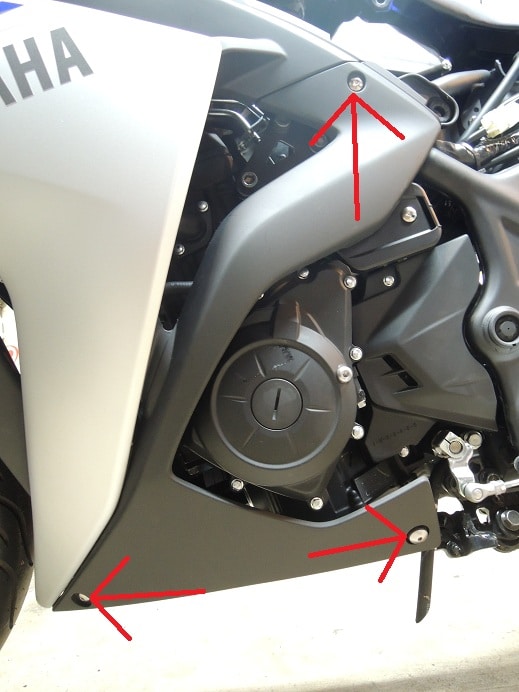
This hook goes into the slot on the lower fairing.

DSCN2611_zpsmzzyuqyl


DSCN2617_zps5xxglxkp


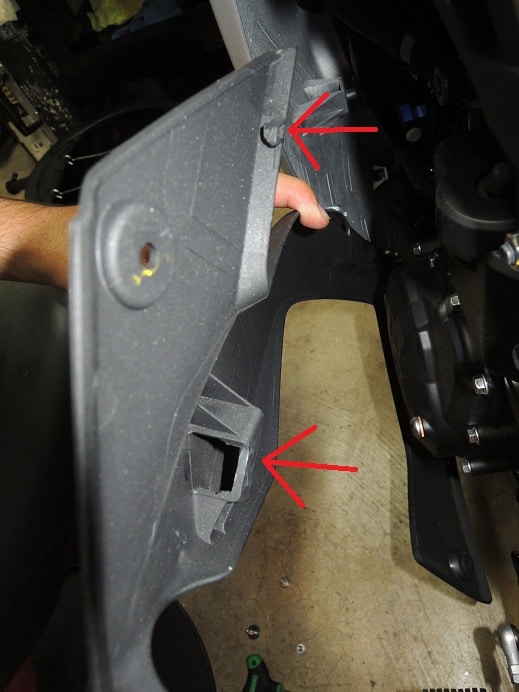
Move to the front, lower portion of the fairing and there are tabs held in slots. You need to pull the fairing down into the wider portion of the slots, then the whole thing can slide back and out.

DSCN2612_zpst5elrnjk

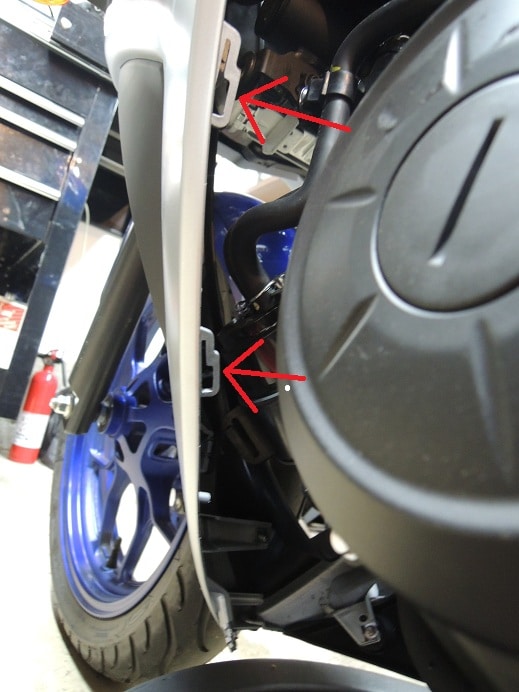
This is what you’re left with.

DSCN2606_zps8cyqljnr


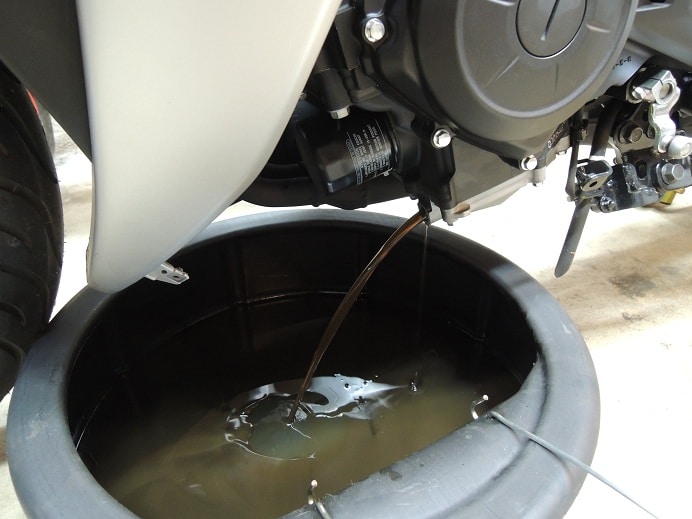
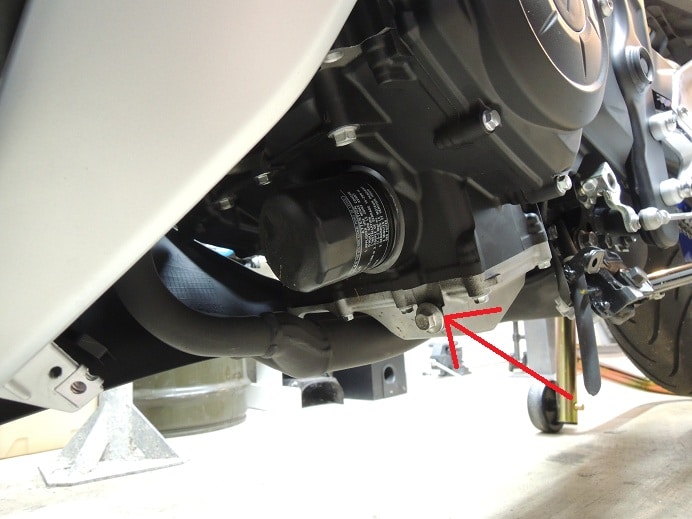
Step 3:  You always want to run an engine to warm it up before doing an oil change.  This warms up the oil so it flows out better, and it circulates it to pick up as much debris in the oil that has settled to the bottom and flow the debris out with the old oil.  If the engine is cold, run it until it’s at 3 bars on the dash temperature display.  Put the catch pan under the bike and loosen the drain bolt with your 12 mm socket.  This is probably where you’ll want to put gloves on since nobody likes getting burned by hot oil and/or skin cancer.  Motor oil is bad for you, try not to get it on your skin.

DSCN2607_zpsmbhbl9hh DSCN2608_zpsqza81eb3


Step 4:  Remove the oil filter.  You can use an oil filter wrench to loosen the filter, but they tend to round off on me and this filter was especially tight from the factory, so I hammered a Phillips screwdriver through the side of the oil filter and used it like a wrench to loosen the filter.  As long as you only stab the end of the filter away from the bike as seen in the photo, you’ll only puncture the filter and nothing vital on the bike.  Obviously, be careful if you choose this method, and try not to knock the bike over.  When you remove the old filter, be sure you remove the old gasket and don’t leave it stuck to the bike.  Installing a new filter with an old gasket still stuck on the bike is a common way to get a bad oil leak.

DSCN2609_zpsyrb18rfi

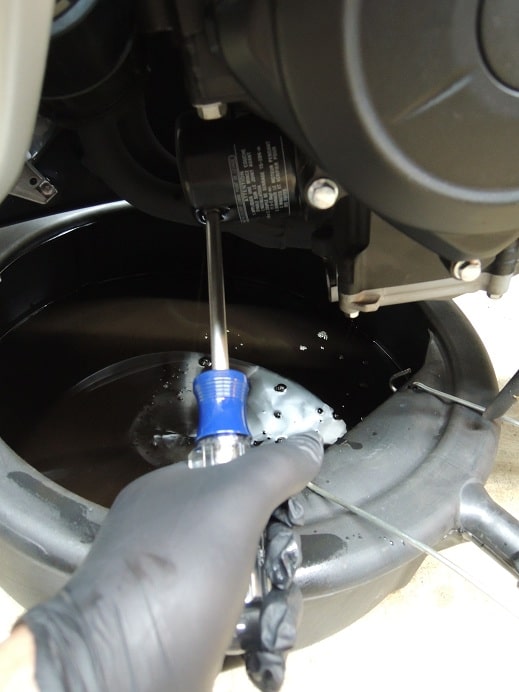
Let everything drain for a few minutes, gently rock the bike back and forth a little, and let it drain a bit more.


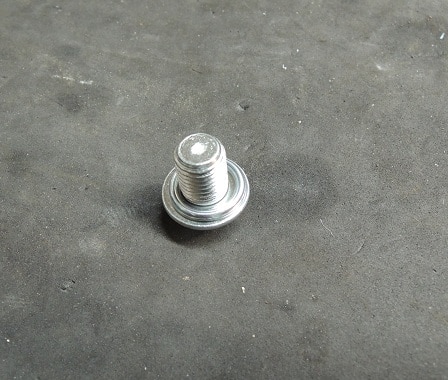
Step 5:  Remove the old washer from the drain plug and put a new one on.  Thread it back into the bike and torque it to 20 Nm (14 ft lbs).  That’s not very much, so it’s important you don’t over-torque and strip the threads, especially if you are using an aftermarket aluminum drain plug, they are very easy to strip.

DSCN2610_zpsfqomnsko


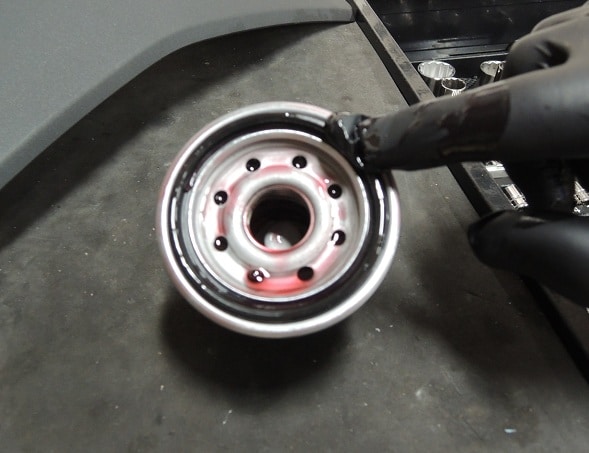
Step 6:  Open your new oil filter, I like K&N filters because they have a 17mm nut on the end that’s drilled for safety wire.  I used a KN204, which is a little shorter than OEM, but a KN148 also fits, it’s just a little longer.  Dip your (gloved) finger in new oil and rub some on the filter’s O-ring.  Fill the new oil filter about half way with fresh oil, then thread it onto the bike.  Get it as tight as you can by hand, then give it maybe 1/16 of a turn with the wrench to snug it up. It doesn’t need to be super tight, the service manual calls for 17 Nm (12 ft lbs).

DSCN2613_zpsdexudcdd


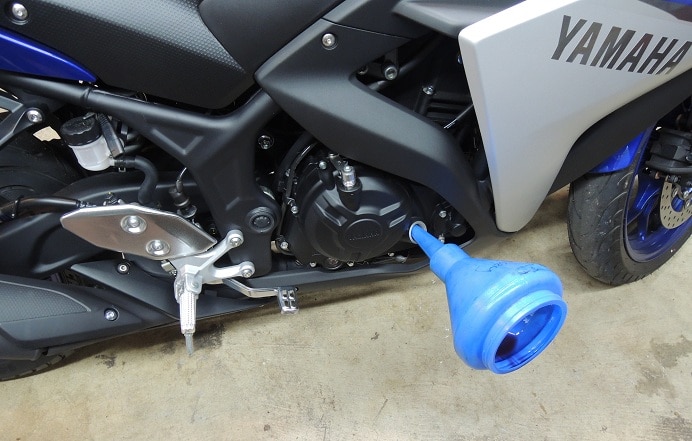
Step 7:  Refill the bike with fresh oil.  The filler cap is on the other side of the bike.  Go ahead and dump in the first quart, but watch closely as you’re pouring in the second not to over-fill, just in case all the old oil didn’t drain out.  When you see oil in the window, put the filler cap back on and run the bike for a minute or two to let the oil circulate. Check it again off the stand but upright and fill as necessary.  Mine took a little over 2 qts.

DSCN2616_zpswrv9l6ox

DSCN2614_zpsdd34zthi

Fairing installation is the reverse of removal. They’re pretty flexible but be gentle with the tabs, especially as the bike gets older.  The plastic gets more brittle with age.  For the lower fairing, the longer bolt goes on the bottom right by the kickstand.

Reset your oil interval by going to the trip meter before the odometer.  Hold reset until it blinks, let go, then hold again until it zeroes out.  Job’s done!

  • Tweet

About Norton Racing

What you can read next

How to remove the tail and taillight of the Yamaha R3
How to remove the fuel tank from the yamaha R3
How to remove the gas tank from the Yamaha R3
how to remove the windscreen yamaha r3
How to remove the windscreen and upper fairing from the Yamaha R3

10 Comments to “ How to do an oil and filter change on the Yamaha R3 / MT-03”

  1. Rubbertyres says : Log in to Reply
    August 24, 2015 at 3:08 PM

    Thanks for the tips. Still wondering to get this bike for my daily commute and the tracks. My r6 abit taxing on my wallet.

  2. Prithviraj Chowdhury says : Log in to Reply
    October 2, 2015 at 8:43 PM

    Respected Sir/ Madam.
    Hope you are doing well.. Itz been really a great help from by posting out so many how to`s , one can really learn from your narration with pictures.. But I need a help Can you please upload or mail me the yamalube OEM Oil filter number like 5GH-13440-20-00 or 5GH-23440-50-00 or whatever the number is.. please help me.
    Thank you

    1. jbluetooth@gmail.com says : Log in to Reply
      October 2, 2015 at 9:56 PM

      I don’t know the OEM Yamaha part number but I used a K&N #204 filter.

    2. David Jones says : Log in to Reply
      November 22, 2016 at 5:45 AM

      Good morning: the oem filter replacement number for yzf-r3 is: 1WDE-41D0-V000 according the replacement parts diagram, but in the filter box there’s other number: 5GH-13440-50, and it’s yamaha/denso brand, it’s the same used for yzf-r1 and yzf-r6 model before 2007, I guess that is the reason of the obumbenumber. Hope it has been useful.

  3. Hernan says : Log in to Reply
    September 14, 2016 at 10:56 AM

    i noticed you’re not using motul. what oil did you use or what oil do you recommend?

    thanks!

    1. jbluetooth@gmail.com says : Log in to Reply
      September 16, 2016 at 9:27 AM

      I run synthetic castrol Power RS Racing oil.

  4. Thomson says : Log in to Reply
    June 4, 2018 at 2:57 PM

    Hello there, in terms of procedure I messed up a little bit and got impatient for some reason. I didn’t realize that 2 L was not enough to even start filling up the “engine oil” window thing. So for some reason I resetted the “OIL” light. Now that everything is properly done, I can’t reset the oil light and that it just stays on. I was wondering if it has any affect on the bike. Its a 2017 r3. Some help will be appreciated.

    1. Jesse Norton says : Log in to Reply
      June 4, 2018 at 5:19 PM

      When you say oil light, do you mean the word “oil” on the dash? Or the oil pressure light? If you don’t have enough oil in the bike, and the oil pressure light is on, that’s bad. If the word “oil” is on the dash, that’s just a reminder to get an oil change, there’s a procedure in the manual to reset it.

  5. Dave says : Log in to Reply
    July 17, 2018 at 12:59 AM

    I just did the first oil change on my R3 and found the drained oil has a gasoline smell to it and looks slightly swirly. I seen on some forums that this can happen on some motorcycles? Just wanted some input. Bike doesn’t have any noticable performance issues, no CEL, no smoke, doesn’t look like the oil level changed from the dealer… I smelled my lawnmower’s oil (lol), because it’s the only other small engine I have for reference and it has the same smell… So normal maybe?

    1. Jesse Norton says : Log in to Reply
      July 18, 2018 at 2:44 PM

      It’s hard to say without seeing it or smelling it. I can’t say I’ve really noticed this, but maybe just because it’s normal to me I don’t notice, not sure. Keep an eye on the sightglass every ride for awhile with the new oil and see what it looks like.

You must be logged in to post a comment.

Search All Posts

Post Category:

Yamaha R3 / MT-03
  • ** Yamaha R3 / MT-03 Critical Issues
  • *** Top 5 Yamaha R3 / MT-03 Mods and Upgrades
  • Annitori Quickshifter QS Pro installed and beta tested on Yamaha R3
  • Dyno tested: 520 vs. 415 chain and sprockets – Yamaha R3
  • How to bleed the brakes or flush the brake fluid on the Yamaha R3 / MT-03
  • How to change the front brake pads on the Yamaha R3 / MT-03
  • How to change the Yamaha R3 / MT-03 to GP Shift
  • How to do an oil and filter change on the Yamaha R3 / MT-03
  • How to get more dash clearance for your clipons and brake line – Yamaha R3
  • How to install a BMC Race Air Filter in the Yamaha R3 / MT-03
  • How to install a stainless steel braided front brake line on the Yamaha R3 / MT-03
  • How to install a Yoyodyne slipper clutch in the Yamaha R3 / MT-03
  • How to install aftermarket clipons on the Yamaha R3 / MT-03
  • How to Install Hotbodies Race Bodywork on the Yamaha R3
  • How to install the Traxxion Dynamics Fork Damper Rod kit with Cartridge Emulators in the Yamaha R3 2015-2018
  • How to remove the emissions systems and install a block off plate on the Yamaha R3 / MT-03
  • How to remove the front wheel from the Yamaha R3 / MT-03
  • How to remove the gas tank from the Yamaha R3
  • How to remove the kickstand from the Yamaha R3
  • How to remove the rear wheel from the Yamaha R3 / MT-03
  • How to remove the side fairings from the Yamaha R3
  • How to remove the tail and taillight of the Yamaha R3
  • How to remove the windscreen and upper fairing from the Yamaha R3
  • How to replace the fork seals on the Yamaha R3
  • Installed: Hotbodies Color Form Race Bodywork – Yamaha R3 2015-2018
  • Lightweight Rear Brake Rotor for Yamaha R3
  • Paint is done, heading to 5zero4 Designs next weekend to install the graphics
  • Suspension Spring Rate Chart for Yamaha R3 / MT-03
  • What are the best clipons for the Yamaha R3?
  • What are the best rearsets for the Yamaha R3?
  • Yamaha R3 / MT03 Exhaust Dyno Test and Superbike Build
  • Yamaha R3 OEM exhaust weight, headers, muffler, slip-on, heat shield

Contact Information

Email: sales@norton-motorsports.com
Telephone: (858) 842-4595

Address

Norton Motorsports
San Diego, CA

Contact us for address before sending anything.

Thank you.

© Copyright Norton Motorsports. All rights reserved.

TOP